Table of contents
Burst of Fire – rules for individual scale World War 2 miniature skirmishes

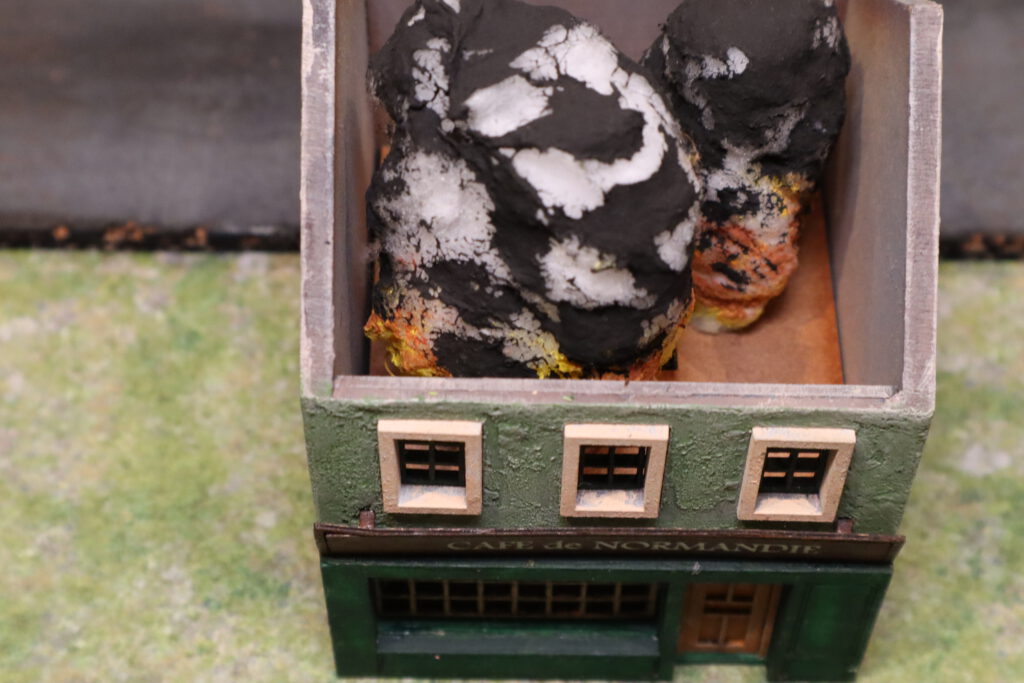
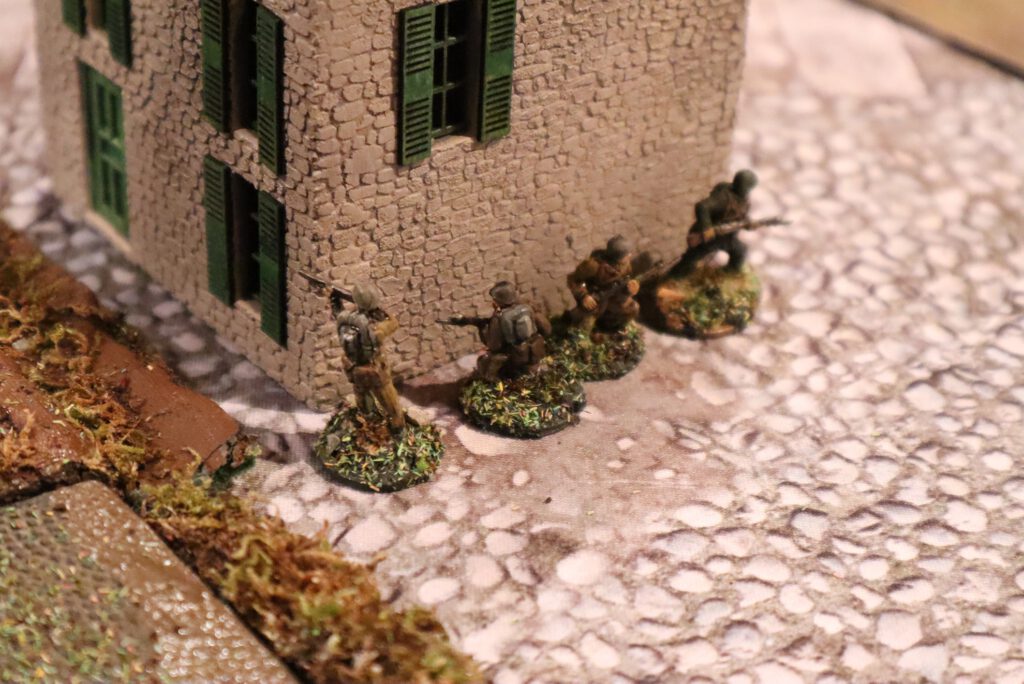
Visit www.instagram.com/tabletopstuff for more awesome pics and tabletop stories
Introduction
Burst of Fire (formerly known as Assault Tactics) is a tactical wargame with action packed miniature skirmishes on individual level set during World War Two. The goal of Burst of Fire is to create a realistic, tactically challenging, atmospheric and fun gaming experience.
Up to six people can play. Each player will put together a detachment that belongs to an infantry, support or armored doctrine. The shape of the detachement is determined by the doctrine. Detachements may consist of commanding officers, squad leaders, soldiers, support weapons, vehicles and/or planes into battle.
When putting your force together, you have to make multiple decisions: Do I want to have more mobile or static force? Which main and side weapons will my soldiers use? Which additional equipment do they bring to the battlefield? Shall I rely on battle-hardened veterans or rookies that have not seen any action on the field yet? Do I salvage enemy weapons or solely rely on my own?
Units on the field will have to deal with the physical and mental strain of combat situations as well as unforeseen events.
Burst of Fire is heavily inspired by miniature games like Bolt Action, Chain of Command, Warhammer, but also by conflict simulations like Conflict of Heroes and computer games like Company of Heroes and Assault Squad.
What you need to play
- Core rules
- Spiral bound books will be available shortly on this website
- Detachment and/or unit lists
- currently available for free on this website:
- Miniatures or counters
- 2D counters will be available shortly on this website
- A gaming table and battle mat (min. 4 by 4 feet)
- Terrain
- 2D terrain will be available shortly on this website
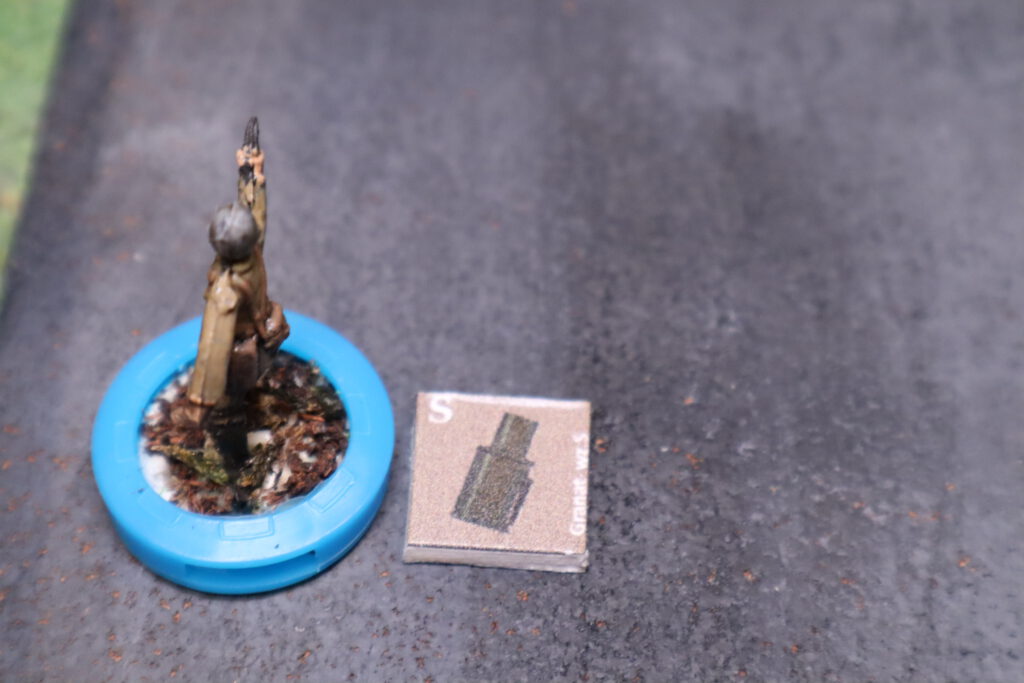
- A pencil and a sheet of paper / Burst of Fire Combat Score and Action Point Counter (Grab them for free)
- Up to five friends sharing the same love for wargaming
- Eight 6-sided dice (D6)
- Effect tokens & smoke markers (Grab them for free)
- Burst of Fire Random Event & Effect Cards (Grab them for free)
- Optional: Digital Burst of Fire gaming aides on our website:
Scales to play (or size does not always matter)
Burst of Fire was developed in 20mm scale but you can play with miniatures from 6 mm to 28 mm miniatures on your tabletop. A table measuring at least 4 by 4 feet is recommended. On the field, one miniature represents one soldier, support weapon, or vehicle. Because of the scale, most of the weapons do not have any limitations of range. A Karabiner 98, for example, had an effective range of 500 meters. Games rarely exceed 200 meters of distance.
Eyes on the victory – take it step by step!
The main goal is to employ a strategy that leads you and your team to victory. You can achieve success by securing vital strategic position(s) on the battlefield or by destroying so many enemy units that the enemy will withdraw from the battlefield.
To create a realistic experience, there is a great variety of rules in Burst of Fire.
Beginners should start by getting used to single game mechanics. Start with a small map and pick five regular soldiers for each side equipped with rifles and grenades. Consult the relevant chapters in the rulebook for moving infantry, small arms fire, and how to throw grenades and build up from there.
After that, you can go with different ranks and ranking officers on the field and maybe bump up the number of soldiers. Finally, you can add morale checks to the mix. The next step uses armored fighting vehicles (AFVs) and anti tank (AT) weapons and figures out the game mechanics for shooting and moving.
Then play with infantry, AFVs, and support weapons at the same time. After that, add planes and random events to the mix. As soon as you have figured out the mechanics on the battlefield, you can dive into the different Doctrines & Detachments. What’s the meaning of the Combat Score? What roles do different scenarios and objectives play?
Long story short: Get to know the system step by step, it will take time, but you will be rewarded for sure and guarantee your victory in the end.
Strategy tips for all players:
- Don’t rely on cheap units only. They will disappear in fire and smoke faster than you might think.
- Use a combination of weapons, don’t only rely on infantry or armored vehicles.
- Never leave your soldiers out in the open. Stay in cover as much as possible.
- Avoid showing side or rear armor to enemy weapons.
- Tanks should always advance, covered by infantry.
- Use terrain to your advantage.
- Look for key positions on the map. Maybe a stone building that gives your troops good cover from enemy fire.
- If you are outnumbered, hide, and make the enemy come to you. Use positions with good cover and line of sight.
- Use group actions commanded by your ranking officers wisely.
- Protect your ranking officer at any cost but still, keep him in play.
- Smoke is always a good idea to conceal your units.
Game setup

- Build/choose a map
- Determine cover/movement values of terrain and buildings
- Choose scenario & determine your strategic targets
- Select nations or roll for random nations
- Select Doctrines & Detachments hidden from opposing players
- Select the number of available points to build your force
- We recommend 100 to 200 points when building your force from scratch
- For starters we recommend to choose an example Detachment from the lists.
- Draw Random Event & Effect Card(s) – follow instructions detailed on the card itself
- Roll a D6 to see in which deployment zone your forces will enter the battlefield. Deploy troops.
- Set up your forces by the alternate placing of units. Roll a die; the higher number starts placement.
- Promote one of your soldiers to squad leader.
- Roll for force morale.
- Determine initiative for the turn: Roll 1 D6. The highest number gets to move/attack first.
- Activate units in alternating sequence alternately. This goes on until one side does not have any actions left. From that point on, the other side will spend the rest of its actions in sequence.
- Remove non-permanent effect tokens before the beginning of every new turn if needed.
- Reset Action Counter before the beginning of each turn.
- Check Combat Score before each new turn. If the Combat Score is at its maximum, the game ends right there.
- Check mission objectives according to scenario/game mode description. If the mission objective is met, the game ends at the end of the opponent’s turn.
- Repeat steps 12 to 17 in each turn.
- After the game, the winner and loser shake hands and “fight” cold beverages and snacks together.
Special rules for multiplayer games
- Deployment: Teams share a deployment zone. You may divide the sectors into flanks, left, right, (and middle if playing 3v3).
- Combat Score: Maximum to win the game remains the same. Each player contributes to a shared team score.
- Initiative: Every player rolls a D6 at the beginning of each turn. The highest number starts. The lower numbers follow in line.
- Unit Activation:
- Activate units alternately according to initiative
- You may only command / activate your own units
- Ranking Officers cannot order actions to units of another friendly player
- The game won’t be over until one side withdraws or has completed the mission objective(s)
- You may cut points for creating your forces in order to make turns faster:
- 4 players – 75 percent for each player 6 players – 50 percent
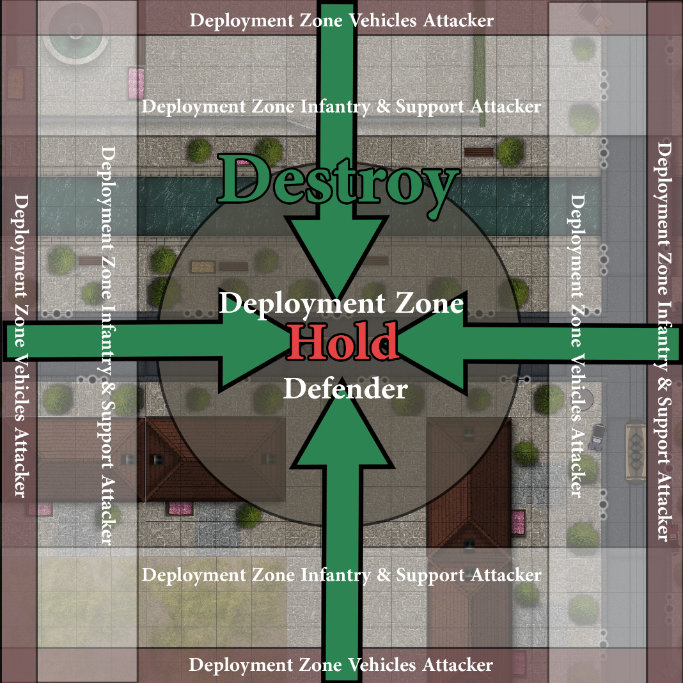
Win conditions
There are three ways to win a game in Burst of Fire:
- One side has completed the mission objective.
- One side has pushed the Combat Score to its limit (default is at 50) and made the enemy withdraw from the battlefield.
- The maximum number of turns has been reached
- Default duration of games is 5 turns
- When the fifth turn ends without one side having completed the mission objective
- Higher Combat Score will declare the winner.
Game modes
There are nine game modes available. Players can use the modes to create a campaign ladder. This step is detailed in the campaign chapter.
The scenarios represent different situations the command and soldiers face on the battlefield. Ranging from scout missions, that symbolize the start of a conflict, to breakout missions, that usually happen when things clearly spiral to an end.
In some cases these scenarios use specific deployment zones and distribution of points to assemble your forces. Doctrines are detailed in the chapter Doctrines & Detachments. For Detachment lists and examples go to the chapter “what you need to play”.
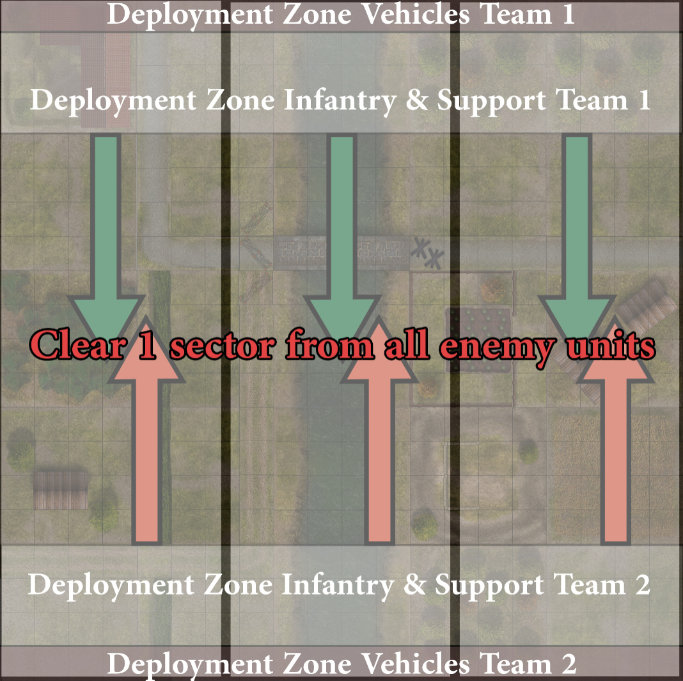
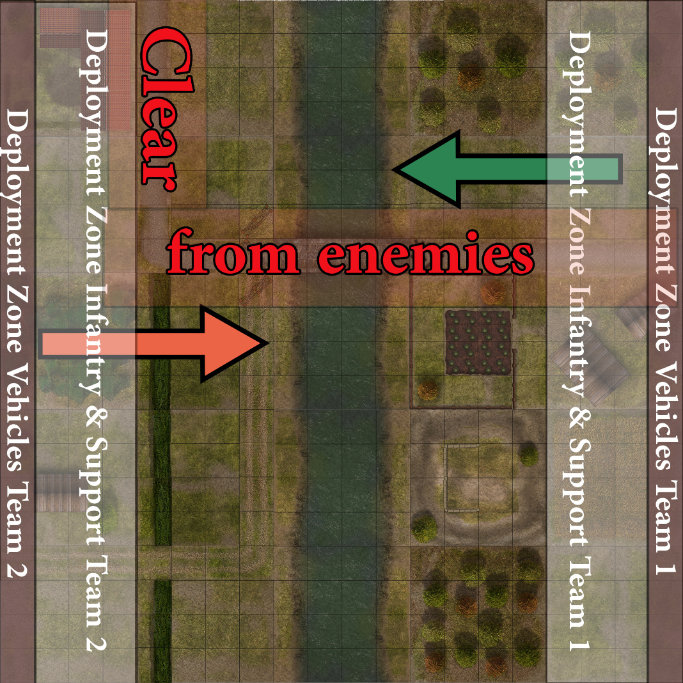
Probing the enemy lines
Win conditions for both teams: Probe the enemy defenses to gather more information about the opposition and create a weak spot in their defenses. Free one sector of the board (middle, left flank, right flank) of enemy forces. The game may end prematurely with on side reaching a Combat Score of 15.
Available points:
- Team A 75
- Team B 75
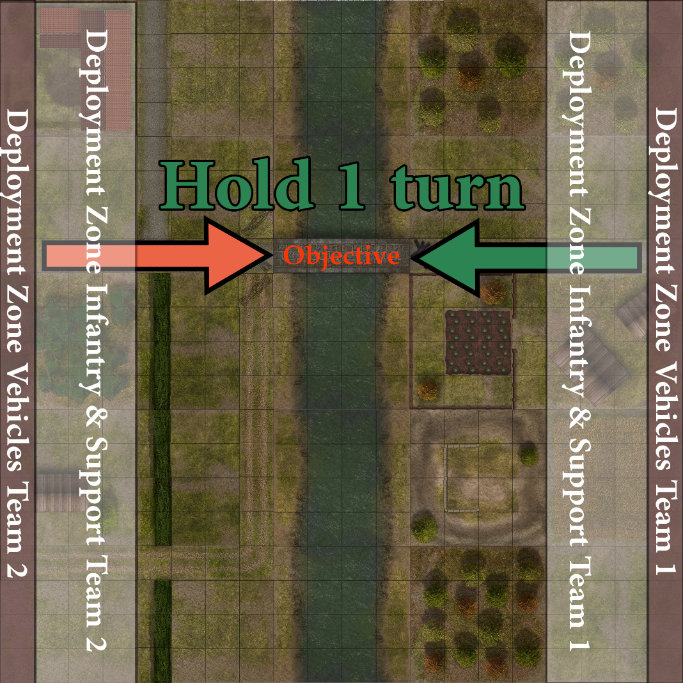
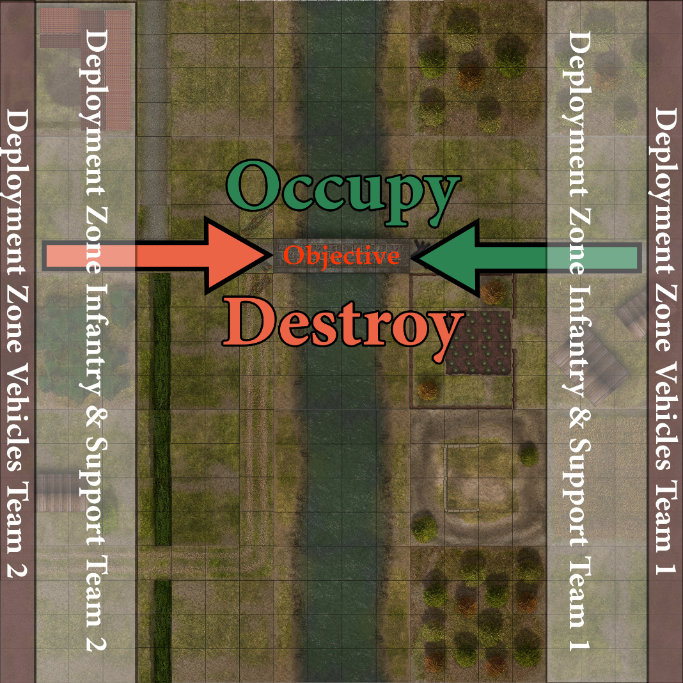
Victory Zones
Win conditions for both teams: Take a strategically vital position to create a foothold in the enemy line. Hold the position for at least one full turn.
Setup: One or more mission objective markers are placed in the middle of the map. The objective(s) may be a bridge, a building, a hill, or something else deemed strategically vital by the high command.
How to capture a victory zone
A zone is captured if one or more soldiers and/or vehicles are in a circle of 10 centimetres (cm) cm) and / 4 inches (in) of the objective. The higher number of soldiers decides which side captures the objective. In this case vehicle crew members are counted as soldiers. Rank and quality of soldiers do not matter in this regard.
Available points:
- Team A 150
- Team B 150
 The Supply Road
Win conditions attacker: To establish a safe supply route to the front, clear every space 15 cm / 6 in to the road from all enemy units trying to ambush our convoys.
Win conditions defender: At least one unit has to remain in the space the attacker has to clear by the end of turn 5. We have to sabotage their convoys.
Available points:
- Attacker 150
- Defender 120
Delay the enemy advance
The highest Roll on the D6 determines the attacker in non campaign games.
Win conditions attacker: Advance fast, keep the enemy from building a cohesive line of defense. Keep vital structures intact. (Bridges, crossroads or buildings, that house important documents and weapon stashes p.e.)
Win conditions defender: On the retreat, destroy all structures that may be deemed vital to the opposition.
How to destroy structures: Structures can be destroyed by being set on fire or blown apart with HE value weapons (flamethrowers, satchel charges, tank guns, AT guns, etc.). See chapter “Take cover” for details on flammable structures. One HE hit will.
Setup note: Objectives are marked with an objective marker. The lowest roll on the dice decides which player or team will be on the retreat.
General note: If there are more than two objectives, you can set a minimum of objectives that have to be captured / destroyed, 2 out of 3 p.e.
Available points:
- Attacker 150
- Defender 100
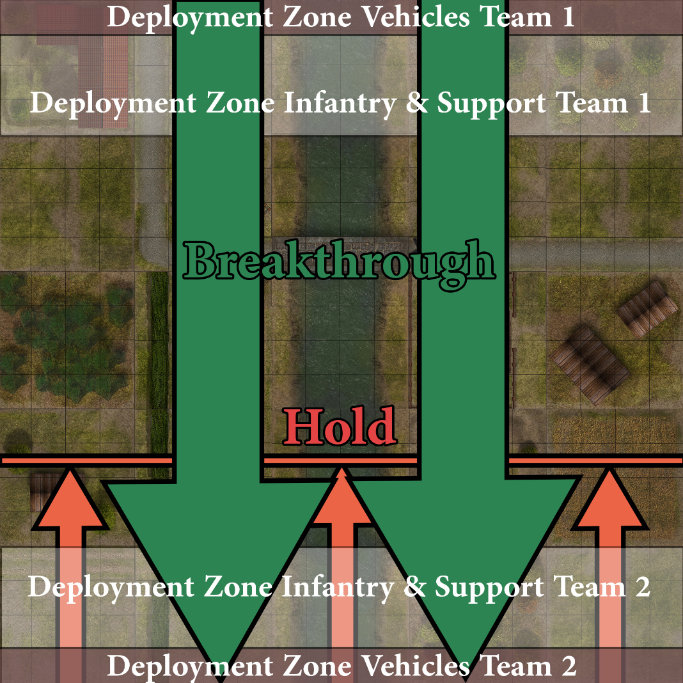
Breakthrough / hold the line
The highest Roll on the D6 determines the attacking player/team in non campaign games.
Win conditions attacker: Punch through the enemy lines. You have to reach the edge of the enemy deployment zone with 5 units minimum.
Win conditions defender: Hold the line. Do not let more than 4 enemy units reach the outer edge of our deployment zone or make the enemy withdraw. If you hold the line for more than 5 turns, victory is guaranteed.
Available points:
- Attacker 150
- Defender 100
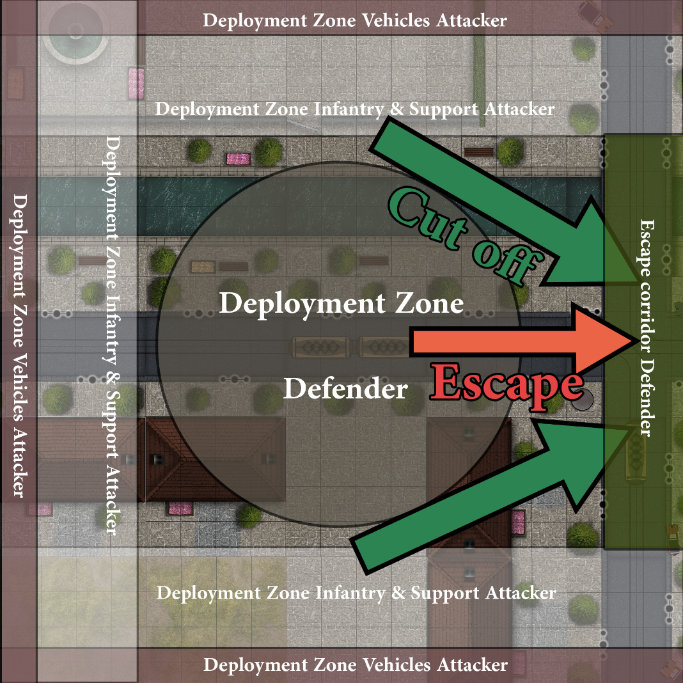
Avoid the pocket
The highest Roll on the D6 determines the attacker in non campaign games.
Win conditions attacker: The enemy is trying to avoid being surrounded by our troops and has only a small corridor to escape left. Close the gap and do not let more than five enemy units escape through the corridor!
Win conditions defender: Your men are almost encircled by the enemy. To save lives and preserve as many fighting men as possible, escort at least five units to the escape corridor safely.
Deployment note: The attacker deploys along three board edges. The defending units start in the middle of the map.
Setup escape corridor: Roll 3D6 in order to determine the direction of the escape corridor. The escape corridor is located between the deployment zones of the players/teams. As soon as the units reach the board edge within the corridor, they have sucessfully avoided the encirclement.
Directions:
3,8,12,16,20 = north
5,9,13,17,21 = east
6,10,14,18,22 = south
7,11,15,19,23 = west
24 = reroll
Available points:
- Attacker 150
- Defender 50
Surrounded
The highest Roll on the D6 determines the attacker in non campaign games.
Win conditions attacker: The enemy is surrounded. Crush resistance and destroy the enemy forces or make them surrender.
Win conditions defender: You are encircled by the enemy. To preserve as many fighting men as you can, break out or make the enemy withdraw because of heavy casualties. Hold postions for at least 4 turns or break out by turn 4. The breakout is successful when three defending units reach any board edge.
Note deployment: The defender starts in the middle of the map, while the attacker deploys along all board edges. Vehicles may only be deployed along the board edges that are farthest away from the enemy positions.
Available points:
- Attacker 150
- Defender 50
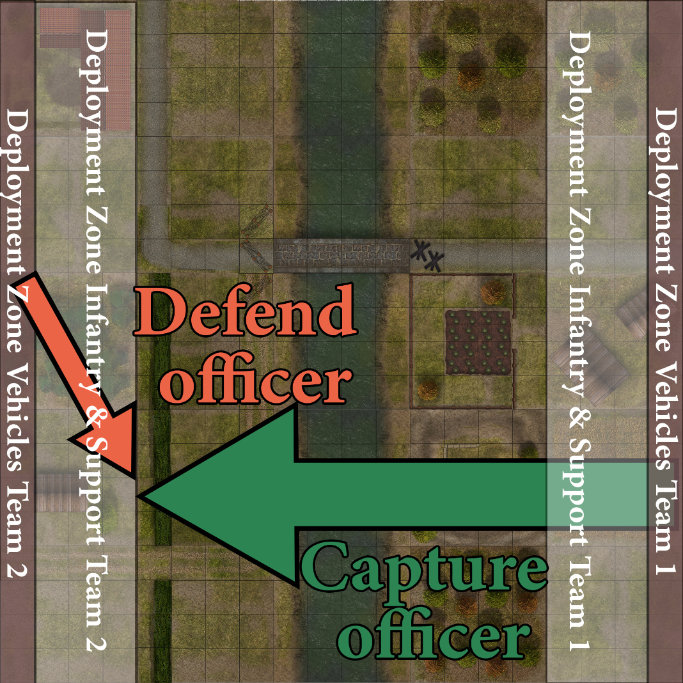
Capture the enemy commander
The highest roll on the D6 determines the attacker in non campaign games
Win conditions attacker: Capture the enemy ranking officer, he is needed alive for a show trial to break the remnants of enemy morale.
Win conditions defender: Keep the ranking officer alive for 5 turns at all cost and make the enemy withdraw because of heavy losses.
How to capture an enemy officer: Ranking officers are captured when the enemy is within 10 cm or 4 inches and there are no friendly units in the same space. When the commander is accidentally killed and not captured, the game is lost to the attacker. (Note: The defender may not kill his own ranking office, that’s cheating and not an option)
Available points:
- Attacker 150
- Defender 50
Combat only
In this game mode both sides will try to push the Combat Score to its limit of 50 points. It is all about applying the best strategy and overpowering the enemy. Both sides have the same amount of points available to spend on their force. The game will end after a maximum of 5 turns.
Available points are completely free to choose here.
Whoever will hit a Combat Score of 50 first or has the most points after 5 turns will win the Combat game mode.
Basics for all players
Available points
The idea of Burst of Fire is to enable the player to recruit and equip a force that matches his style of play. Equipment and personnel are bought with points. The number of additional points varies from doctrine to doctrine (see doctrine list) and is also dependent on the scenario (Go to chapter game modes).
Doctrines
Doctrines determine how your force will look like. Maybe your force has been trained to push back enemy tank rushes or maybe they are paratroopers that are low in numbers but exceptionally well trained for any kind of combat. Every doctrine comes with strengths and weaknesses. The availability of units varies with the doctrines you select. Some of them incorporate fast and/or powerful units. While others may rely on strength in numbers or have a strong command structure.
In a multiplayer game each player may select a different doctrine to create a powerful team and to add to the strengths of the team mates and to cover their weaknesses.
Details for each available doctrine are laid out in the matching doctrine lists that are part of this book and will be published online or in further books. Of course, you are encouraged to make your own doctrines and doctrine lists and share them with the Burst of Fire community on Facebook.
Detachment and unit quality
The quality of a detachment and its individual units is determined by the equipment, the quality of command structure, the amount of training the men have received and the experience they may have already gathered in battle.
Three quality levels apply to infantry, support crews, and vehicle crews: conscript, regular, elite. You may use the badges from the print & play set or use colored bases or wrap key rings around the bases to make the different levels of quality visible.
Conscripts are inexperienced troops that come at a low cost and with a -1 penalty on morale rolls and any attack rolls.
Regulars have absolved a sound training and already have gathered some experience in the field and therefore are a bit costlier. They come with no penalties or bonuses on morale and attack rolls.
Elites are the backbone of every force. They are seasoned veterans and the most expensive class you can buy. They come with a +1 bonus on all attack and morale rolls.
Optional Rule: Your units may gather experience on the field of battle and will ascend one quality level for every two kills. Track the kills by using dice, tokens or keeping notes.
Special: Squad Leaders. Before the game you may appoint one soldier to be squad leader. Squad leaders may try to rally two suppressed soldiers per turn in their radius (10 cm / 4 in) by passing a morale check for each soldier to be rallied. To promote a soldier to squad leader is free of any cost. Squad leaders receive an additional +1 to morale and +1 for all attack rolls.
Note: Not all levels are available to every doctrine. Availability is shown in the detachment lists.
Combat Score
By killing and forcing enemy units to surrender, you score points on the Combat Score. When the Combat Score reaches its limit, the enemy will withdraw from the field of battle and you have won the game. The default maximum Combat Score is 50. However, this value may be adjusted freely to make the games longer or shorter. Also, some game modes and scenarios might use a different maximum on the Combat Score.
The Combat Score is determined by the cost of the killed unit. The cost can be found in the detachment lists. So, it is one thing to lose a conscript soldier or tank crew worth 1 point and a whole other thing to lose a medium or a heavy tank easily worth 20 plus points.
Be sure to always protect your leaders. Killed ranking officers weigh in with 10 points. Killed squad leaders with 5 points.
Note: Handheld weapons will be left in the field and do not weigh in on the Combat Score. Other players may pick them up and use them.
Deployment
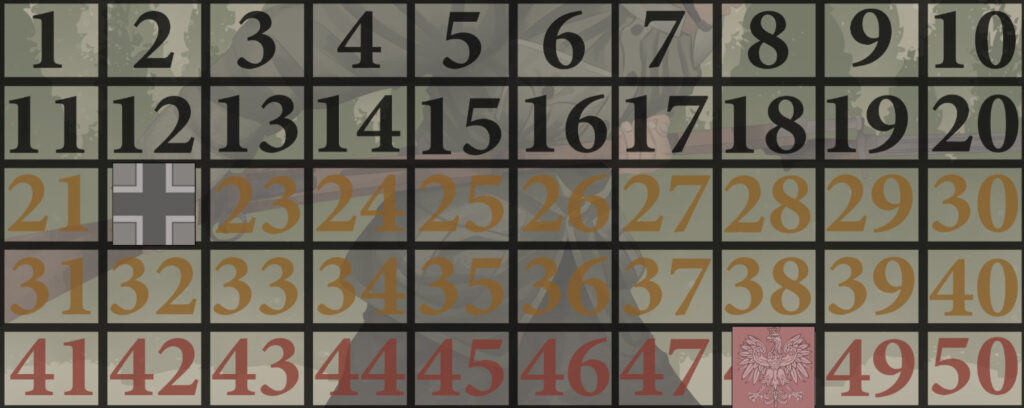
One of the players rolls 4D6. He adds the rolled pips on the dice to determine his deployment sector:
| Roll (4D6) | Deployment Sector |
| 4,8,12,16,20 | North |
| 5,9,13,17,21 | East |
| 6,10,14,18,22 | South |
| 7,11,15,19,23 | West |
| 24 | Reroll |
Deployment zones are always directly facing each other. So, only a south / north or east / west pairing is possible. Players place their troops in an alternating fashion. The player who rolled for the deployment sector also may place the first unit. To save time, you may also place your units simultaneously.
- Infantry and support weapons may be deployed anywhere in a 50 cm / 20 inches range from the edge of the deployment zone.
- Tanks and mounted troops have to start along the board edge.
- Special deployment (See game modes):
- Open pocket: The defending player rolls for the location of the escape corridor. This roll works exactly like the roll for the deployment sector.
- Pocket battle: Deployment zones are set from the beginning.
Actions & Action Point Counter
Each detachment has a certain number of actions available that can be performed during a players turn. When building their force, each player will receive an action per infantry, crew member, support weapon, plane and vehicle he buys. So if the detachment he chose consists of 10 infantry men and a car with one driver, the player will have 12 actions available per turn. Also each player will loose an action for each of his infantry, crew members, support weapons, planes and vehicles killed.
Each unit may perform a certain number of actions per activation. The number of actions depends on the unit type and for AFVs on the number of crew members.
| Unit type | Number of actions | Note |
| Ranking Officers | 2 | To give multiple orders equals one action spent |
| Squad Leaders | 2 | To rally two infantry units equals one action spent |
| Infantry and crew members | 2 | |
| Support weapons & Infantry carrying heavy gear | 1 to 2 | All support weapons and infantry carrying heavy gear may either move or shoot. Machine Guns may shoot twice (double burst). |
| Transports | 2 | Unloading or loading all cargo equals one action. |
| AFVs (up to 5 crew members) | 2 | |
| AFVs (more than 5 crew members) | 3 | These heavy fighting vehicles were a terror on the battle field. To symbolize their heavy firepower they are allowed to perform an extra action. However, the may not spend their third action to do a triple move. |
| Planes | 1 (bombing) / number depending on machine guns and autocannons (strafing) | Planes bomb or strafe, they do not spend any actions for movement. |
Units may always choose not to use the full amount of actions available to them. But even if not going for the maximum amount of actions, units may only be activated once per turn. Ranking officers may be activated multiple times per turn, depending on their doctrine. Units that have performed one or more actions during their activation are hit with a spent marker.
For each action performed the player has to move one field down on the action point counter.
The following counts as one action:
- single move
- use primary or side weapon
- pivot outside of the firing arch
- turn a turret more than 90 degrees
- mount transport or vehicle
- dismount from transport
- load cargo
- unload cargo
- hide
- unhide
- cross obstacle
- Give orders
Players may combine these actions however they see fit.

Actions on the Burst of Fire Action Point Counter: The German player has spent three actions and moves his token accordingly down the Action Point Counter. Now he has 4 actions left to spend this turn.
Units
There are eight types of units in Burst of Fire:
- Ranking Officers
- Squad Leaders
- Infantry
- Crews
- Support weapons
- Armored fighting vehicles (AFVs)
- Transports
- Planes
Unit stats
Each unit has different stats. These stats are detailed in the detachment lists or on the unit cards and unit lists. There are cards and list entries for infantry units, ranking officers, vehicles and support weapons. Here you can find two examples.
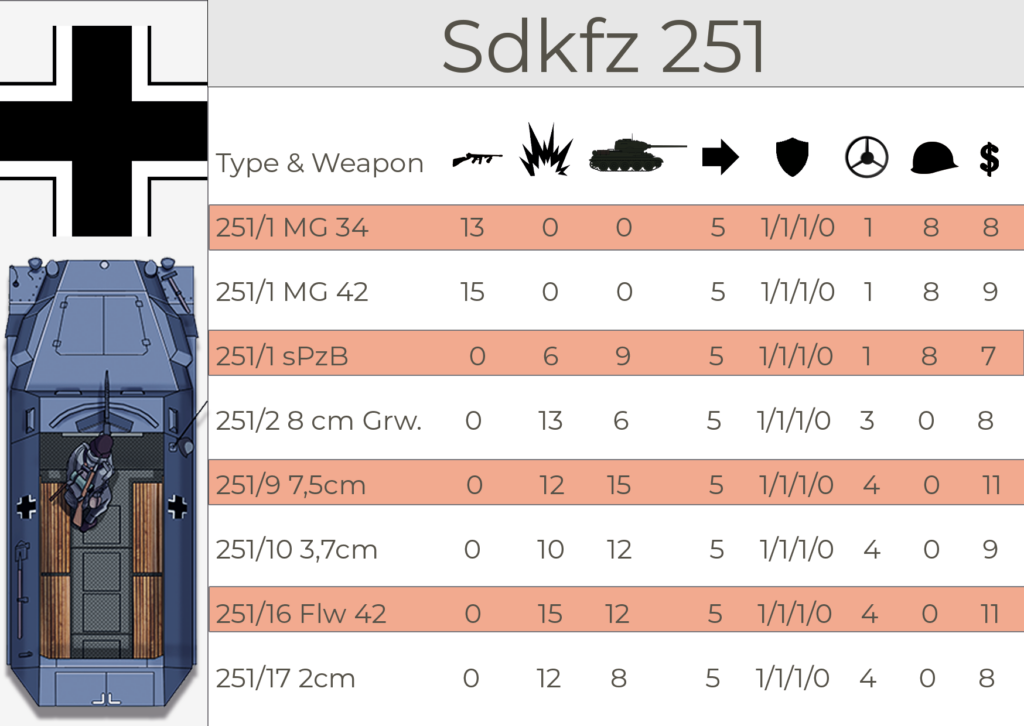
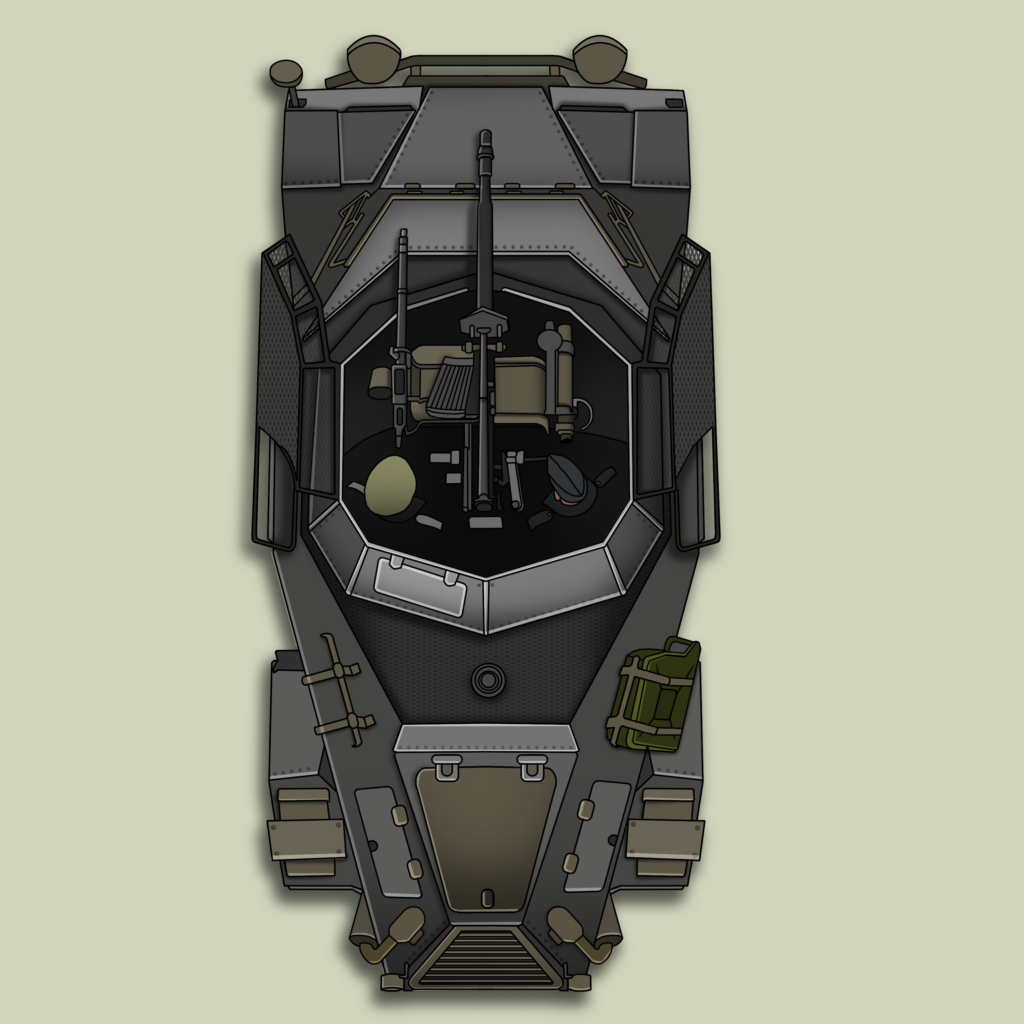
This is a Burst of Fire unit stat card for the versatile vehicle Sdkfz 251 that the German Heer used in many variants. Stats are divided into attack vs. infantry and softskins, attacks with high explosive ammo, attacks vs. armored targets, mobility, armor (front, side, rear, top), crew, passenger capacity and cost.
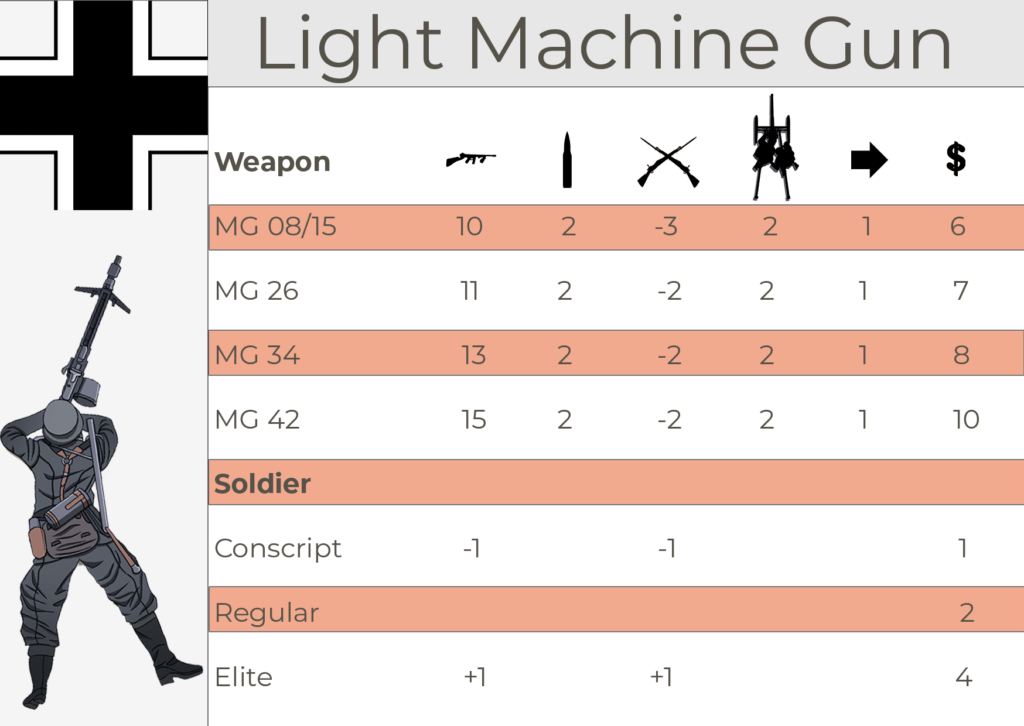
This is a Burst of Fire unit stat card for German soldiers carrying a light machine gun. Stats are divided into attack vs. infantry and softskins, number of possible attacks per turn, melee value, number of soldiers or crew needed to be fully operational, possible moves per turn and cost.
Armor
Marks the ability to bounce enemy armor penetrating shells. Armored units can only be harmed by units with armor penetration value or if grenades are dropped in their interior.
The armor works of a vehicle are divided into four sectors:
- Frontal armor
- Side armor
- Rear armor
- Top armor
On the unit cards it will read like this 1/2/3/4. The armor value is indicated by the shield symbol.
Note: One armor point reflects about 15 mm of armor thickness in reality. Top armor applies to vehicles getting hit by bombing runs, arching shots fired by artillery, or units directly aiming for the turret.
Attacks vs. infantry and softskins
Marks the ability to damage enemy infantry units and softskins with small caliber ammo. You will find the firepower of each unit detailed in the detachment lists or the unit cards. Applies for small calibers like machine guns or rifles. In the lists small caliber frepower is indicated by a tommy gun symbol.
Attacks with high explosive ammo (HE)
Marks the ability to damage non armored targets with high explosive ammo. Applies to AA guns, field guns, bombs, AT-weaponry, grenades, and tank guns. On the unit cards, this value is represented by this explosion symbol.
Attacks with armor penetrating ammo (AP):
Marks the ability to damage armored targets with high explosive ammo.Applies to AA guns, field guns, bombs, AT-weaponry, and tank guns. On the unit cards, this value is represented by this tank symbol.
Cost
Marks the number of points a player has to spend to make the unit part of his force. The cost of a unit is marked with the dollar symbol on the unit cards.

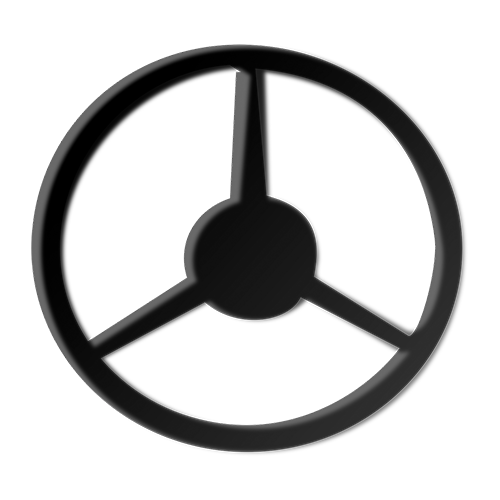
Crew members (vehicles)
Marks the number of crew members vehicles need to be fully operational. Applies to all vehicles. Any drop below 50 percent of the needed crew members will make the unit loose one of its actions per turn. The number of crew members needed is represented by this steering wheel symbol on the unit cards. For gameplay purposes we suggest to have place a small die next to the vehicle showing the number of crew members alive.
Crew members support and infantry weapons
Marks the number of crew members infantry weapons and support weapons need to be fully operational. For any infantry weapon any drop below 50 percent of the needed crew members will make the unit loose one of its actions per turn. Support weapons with less than half of the needed crew may only be activated every other turn. The number of crew members needed is represented by the at gun and crewd symbol on the unit cards. For gameplay purposes we suggest to have place a small die next to the support weapon showing the number of crew members alive.

Mobility
Marks the ability of how fast a unit can move on the battlefield. Infantry and support weapons move at a set pace. The range of movement for infantry is set to 10 cm / 4 in per move. One move equals one action. Infantry may double move once per turn if not carrying any heavy gear. The range of movement for support weapons is set to 5 cm / 2 in per move. They may be towed by other vehicles in order to reach their point of destination faster. Infantry may mount transports to do the same.
Vehicles and horses move by rolling a set amount of D6s. Like infantry, one move equals one action. Slowest vehicles move with 1D6, which is below 10 kilometers or about 6 miles per hour. Fastest vehicles move by rolling 8D6s, this equals a speed up to 100 kilometers or 60 miles per hour. Vehicles and horses may double move.
Planes would be too fast to measure in the chosen scale, they have „unlimited“ range and sweep over the battlefield if not stopped by enemy anti-air. Planes are „parked“ off- map, when not in action.
One point of mobility equals one D6 to roll. The mobility of a unit is indicated by the arrow symbol on the unit cards.

Number of attacks per turn
Marks the number of attacks infantry units or support weapons may perform during one turn. On the unit stat cards the number of attacks per turn is symbolized by the ammo shell symbol.

Passenger Capacity
Marks the number of passengers a transportation vehicle can carry. The maximum number is represented by the helmet symbol on the unit cards. For gameplay purposes we suggest to have place one or two small dice next to the vehicle showing the number of passengers riding along.

INSERT WEAPON CARDS and Melee modifiers
Ranking Officers
In Burst of Fire, ranking officers represent senior leaders on the 2nd and 1st lieutenant level. Ranking officers are a vital part of the command structure. Each doctrine fields a ranking officer. Ranking officers are not bought by the player but are assigned to every detachment. The abilities of each ranking officer can be found in the arsenal lists.
Every ranking officer may order several actions per turn. Orders will break up the alternating activation of units by each player. All orders will be performed in a coherent sequence and documented on the Action Point Counter.
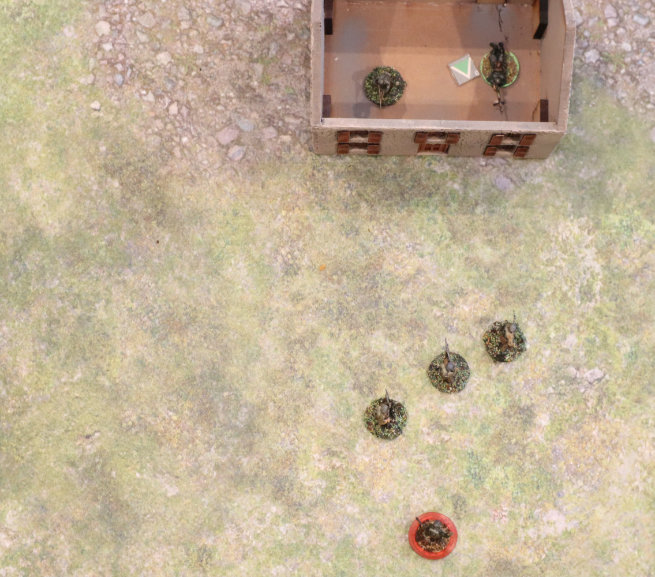
This ranking infantry officer (marked with the red circle) has three soldiers in his command circle. He will most likely order his troops to engage in melee with the enemy that has taken position in the basement of a stone house that offers hard cover. This way the officer will spend three actions he commanded to his soldiers and another action for giving the order.
The number of actions a ranking officer can order depends on the doctrine that has been selected by the player. Some officers may be activated numerous times per turn and therefore may issue more orders per turn. Orders can be issued in the command radius. The radius may differ from doctrine to doctrine. Enemy players may only interrupt orders if they opted for covering fire.
Another key task of raning officers is to boost morale and attack levels. Also, ranking officers will strengthen the spirit of their troops, that are currently inside the command radius, and give them bonuses of +2 on all attacks and +2 on all morale checks.
Ranking support and infantry officers may rally all units in their command radius once per game. To make a successful rally the ranking officer has to pass a morale check. Rallied units loose all of their suppressed tokens.
Just like infantry, ranking officers may carry primary and side weapons.
Each officer has two actions per activation. Giving orders or rallying counts as one action not depending on the number of orders.
Death of ranking officers
When a ranking officer dies, the command structure takes a severe hit. The total of actions these officers may command is subtracted permanently from the Action Point Counter. To prevent ranking officers from dying way too easily, friendly soldiers present in a 5 cm / 2 in range may take the bullet instead of the ranking officer.
Squad Leaders
Each player may appoint a squad leader without any additional cost. Squad leaders strengthen the ability of infantry to stay in play despite enemy fire. Squad leaders may not issue orders like ranking officers but have the ability to rally two units in a radius of 20 cm / 8 in per turn.
To make a successful rally the squad leader has to pass a morale check. Rallied units loose one of their suppressed and/or frightened tokens. For each soldier the squad leader tries to rally he will spend one action. Each squad leader will receive a +1 on his own attacks and morale checks.
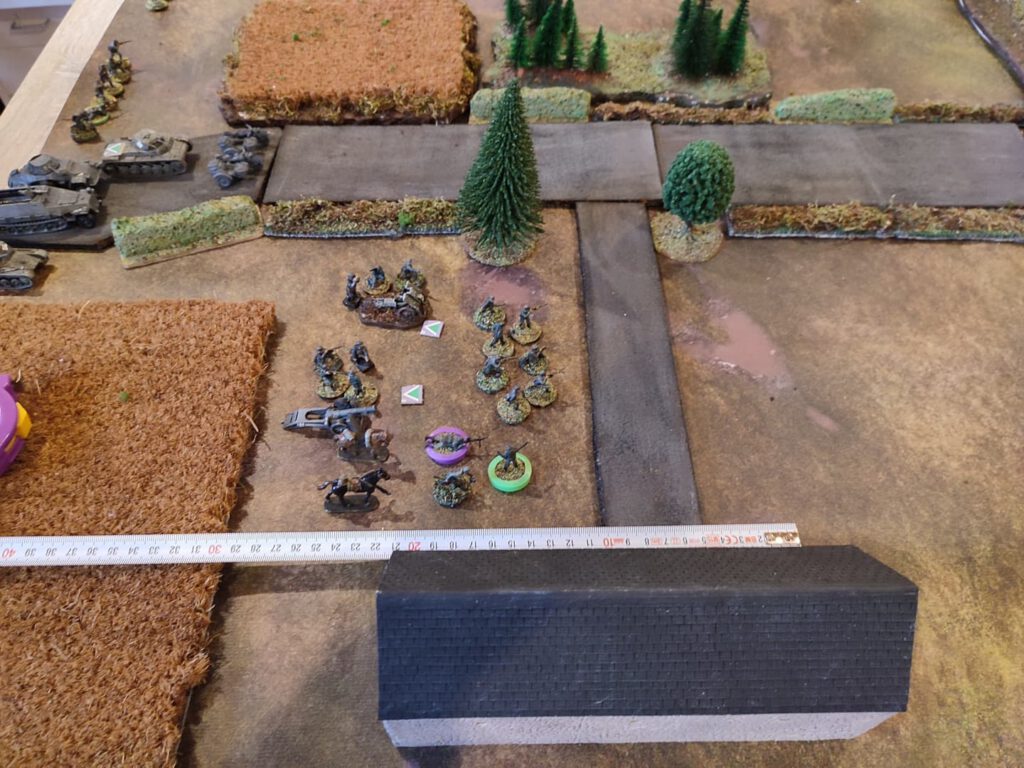
Mark your squad leader with a colored ring or token. This squad leader has plenty of troops in his command radius of 20 cm / 8 in he can rally when the bullets start to fly.
Infantry and support crews
Infantry is available in the levels conscript, regular and elite (see table above). Infantry may be equipped with individual weapons like carbines, light machine guns, and grenades. Infantry is also used to crew support weapons like machine gun emplacements, anti-air guns, or field guns. The number of weapon crew members needed is detailed in the doctrine list or on the unit cards.
Quality Levels of infantry and crews
Depending on the quality level, units receive penalties or bonuses on attacks and morale checks. These penalties and bonuses always count per die rolled. They apply to vehicle crews, support crews, and infantry. Regulars and Elites will receive badges, to show their advanced level.
Optional Rule: Your infantry and crew may gather experience on the field of battle and will ascend one quality level for every two kills. Track the kills by using dice, tokens or keeping notes.
Unit quality
| Level | Bonus/Penalty Attacks | Bonus/Penalty Morale Checks |
| Conscript | -1 | -1 |
| Regular | 0 | 0 |
| Elite | +1 | +1 |
This infantryman is a conscript. Players do not have to mark conscripts with a badge or token. He will receive a -1 on every attack roll and morale check.
When a support weapon is destroyed, its crew still may engage the enemy. All crew members are equipped with carbines by default but fight at a disadvantage of -2 on every attack roll.
Firearms and handheld weapons
Infantry may equip one primary and multiple different side weapons like grenades for example. The main weapons will mainly be used for ranged combat but in some cases may also help with melee.
Primary and side weapons
| Primary Weapons | Side Weapons |
| Pistol | Pistol |
| Rifle | Knive |
| Submachine Gun | AT Grenade |
| Light Machinegun | Hand Grenade |
| Sniper Rifle | Smoke Grenade |
| Small Mortar | Bazooka and Panzerfaust/-schreck |
| AT Rifle | |
| Flamethrower | |
While using the side weapon, you can blow up objectives or bust enemy tanks. Side weapons like knives also improve your chances of winning a melee situation.
While side weapons like bayonets may be used multiple times, each grenade and satchel charge can be used only once. Stats for every handheld weapon are shown in the corresponding lists.
When a soldier dies, he will leave his primary and side weapons on the battlefield. Gear may be picked up by friendly or enemy units.
This officer carries a pistol as a primary weapon. Additionally he is equipped with a smoke grenade to give his advancing troops additional cover.
Support weapons
This applies to crewed weapons like medium and heavy machine guns, AT & AA guns, and howitzers.
Support weapons may be loaded into (medium and heavy mgs and mortars) or towed by transports (AT guns, AA guns, etc.). As far as realism goes, keep in mind that a motorcycle most likely will not pull a heavy field gun. Also, one horse may tow a light AT gun but not a Flak 36 88mm.
Support weapons may be placed on hills, in buildings, bunkers, and behind sandbags. Additional cover will be dearly needed; otherwise, crews will die fast. AT & AA guns placed in buildings or bunkers may not be moved for the remainder of the game.
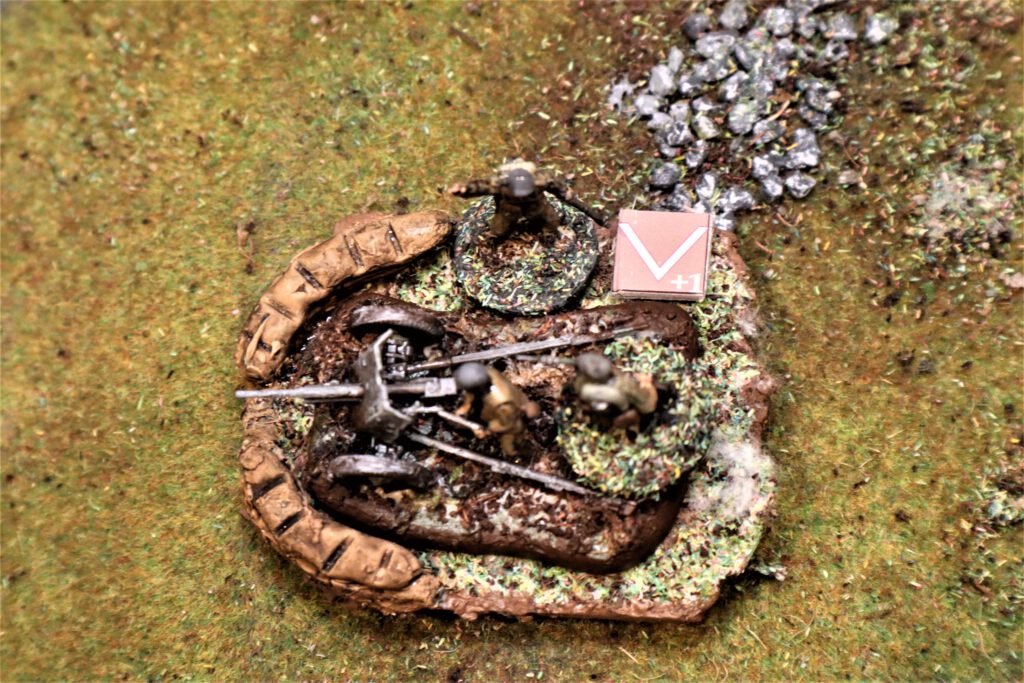
In Burst of Fire anti tank guns are regarded as support weapons. This russian AT gun is crewed by elites and will receive a +1 on all attack rolls and morale checks.
Machine guns
Machine guns are a very effective weapon vs. infantry. Multiple enemy units can be hit by a single burst of bullets. However, they do lack accuracy on greater ranges. Light versions of machine guns are carried as main weapons by infantry. Medium and heavy machine guns count as support weapons and have to be crewed accordingly.
British Vickers machine gun.
Field guns / small Howitzers
Howitzers and field guns are effective versus infantry, fortifications and tanks. When firing high explosive rounds, they can hit and harm multiple targets (See blast radius). They may lack accuracy but are able to fire at units that are not in direct line of sight.
US 75mm howitzer.
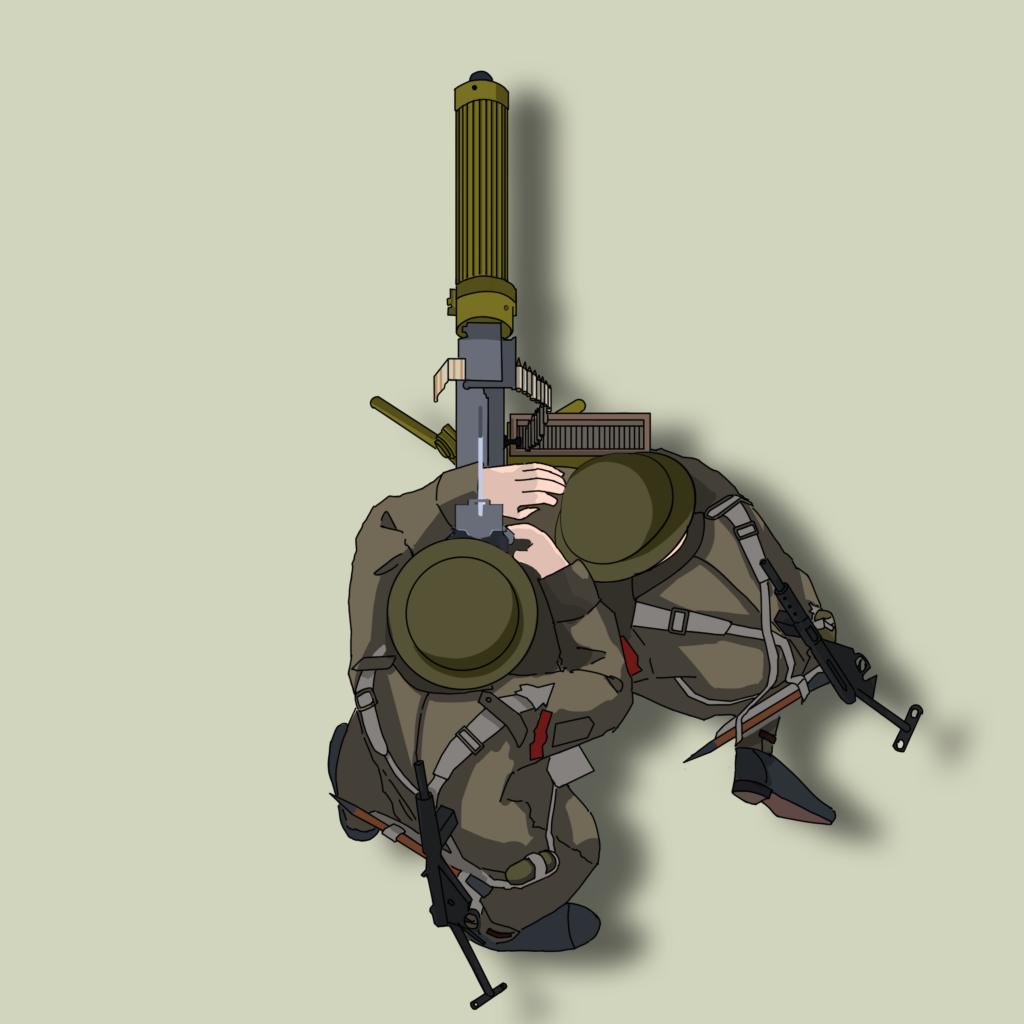
Light mortars
Light mortars are small artillery pieces best used to eliminate enemy infantry that is not in direct sight or hiding behind open top cover. They count as main weapons, because they can be carried by a single infantry unit. After all, they also have a support weapon character, because they only work properly with a certain number of soldiers assigned to it.
Mortars are cheap to buy but have a minimum range of 50 cm / 20 in. The accuracy of mortars is not very high.
Anti-air (AA) guns
Anti-air guns are the only units that may actively fire at enemy aircraft. They can strike first and intercept enemy planes. Preventing them from strafing or bombing units.
They will use their HE values to shoot at unarmored planes. The AP value is used against armored planes like the soviet IL-2 for example. AA guns may also fire at ground targets and have the ability to harm armored units.
Soviet Truck with fouir mounted Maxim machine guns used for anti air purposes.
Anti-tank (AT) guns
Anti tank guns may fire at ground targets, fortifications, and other buildings. To remain hidden from the enemy, AT guns may be placed on the board in ambush mode. They can only be revealed by infantry entering super close range.Ambushing units may reveal themselves and shoot at the enemy in the same turn. Once AT guns have attacked, they stay exposed to the enemy.
AT gun shields provide soft cover for the crew when being attacked from the front. Taking over enemy weapons and equipment. Every weapon and equipment left behind may be taken over. Enemy crews/soldiers operate scavenged weapons during the same game at a penalty of -1 per attack roll. During campaigns, scavenged weapons may be operated without any penalty after the game they have been scavenged.
British 17 Pounder
Vehicles
Burst of Fire offers an arsenal of historically accurate vehicles – consisting of tanks, armored cars, and transport units like trucks, half-tracks, motorcycles and such. All vehicles get specific bonuses or penalties for moving on different terrain types such as paved or dirt roads (See chapter moving on different types of terrain). The stats for all vehicles are detailed in the arsenal lists.
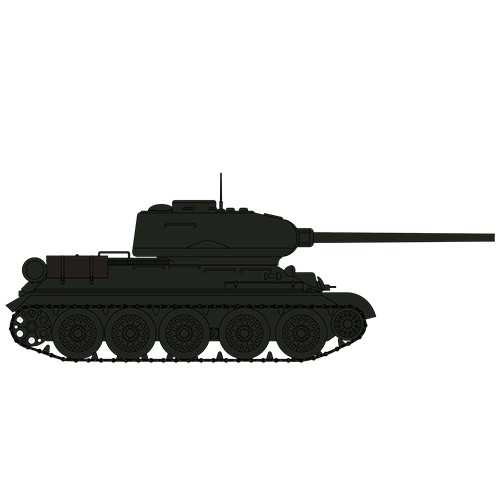
Tanks
Tanks are armored vehicles with (often) incredible firepower against infantry and other tanks, but apart from mobile armored reconnaissance slower in terms of movement.
German Tiger I heavy tank.
Armored cars
Armored cars are faster than tanks but most likely less armored. They do bring a punch versus infantry and can knock out bigger tanks by flanking them or attacking them from the rear.
German armored car Sdkfz 222
Transports
Transport vehicles may carry a certain number of soldiers and towed weapons to the frontline fast. The crew, driver, and gunner (if needed) are staffed by transported soldiers and may dismount to engage the enemy once the destination is reached.
Japanese type 94 truck
Transported units firing
Tank riders: Tanks may carry infantry to the front. For the sacrifice of accuracy, tank riders may fire at enemy targets while being transported.
Passengers open small vehicles: For the sacrifice of accuracy, passengers may fire at enemy targets while being transported in small open vehicles.
Mounted cavalry and infantry: Infantry and cavalry may shoot from horseback. Cavalry will have to sacrifice less accuracy on shooting than mounted infantry.
DATA TABLE FIRING TRANSPORT UNITS
Vehicle crews
Each vehicle has to be manned by a certain number of crew members. The number of crew members needed is shown in the corresponding lists and on the vehicle counters. Crews have to be of the same quality level. Much like with infantry following levels are available: conscript, regular, elite.
Crews are very effective inside of the vehicle. Suppose the number of crew members is reduced by over 50 percent due to heavy losses. In that case, the vehicle suffers penalties in its effectiveness and may only perform one action per turn. (See chapter Actions for further detail.)
Suppose the vehicle is destroyed and/or abandoned. In that case, all remaining crew members will receive pistols to fight on the battlefield. They will suffer a -2 on every attack roll. Their melee value is that of a conscript.
Placing vehicle crews and support crews on the board
Mark the vehicle with a colored object or badge (you can find badges in the Assault Tactics downloads) to show the quality of the crew. The number of alive members is tracked by using a D6.
Manning abandoned vehicles
All abandoned vehicles can be taken over by enemy infantry or enemy crews that had to leave their own vehicle. However, the crew will not be used to the new vehicle and suffer penalties for operating the newly acquired vehicle.
Of course, a crew that was forced to bail because of an enemy hit may reenter the vehicle in the next turn without suffering any penalties.
Manning abandoned vehicles
| Type of Vehicle | Type of Crew | Penalty Movement | Penalty Attacks |
| AFV | Vehicle Crew | Abandon highest die | -1 |
| AFV | Infantry | Abandon highest and lowest die | -3 |
| Unarmed Transport | Vehicle Crew | none | / |
| Unarmed Transport | Infantry | none | / |
| Armed Transport | Vehicle Crew | Abandon lowest die | -1 |
| Armed Transport | Infantry | Abandon highest die | -1 |
Planes
There are two types of planes players can use in Assault Tactics: fighters and tactical bombers. Planes sweep the battlefield when attacking. They are placed off-board after having completed their task.
Fighters are armed with multiple machine guns. These planes may be used to attack/ intercept enemy aircraft, strafe infantry, support weapons, and soft skin vehicles. They also may try to suppress enemy armored vehicles.
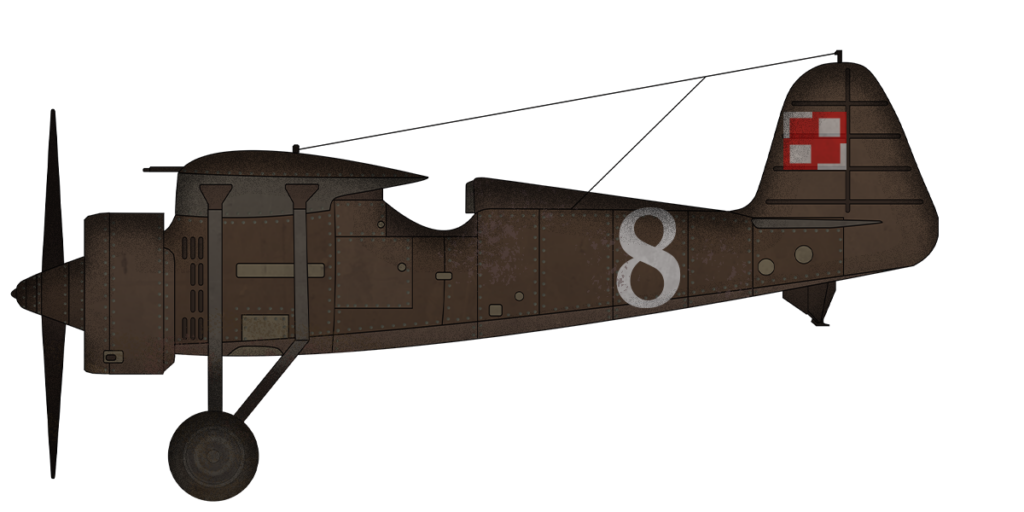
Polish fighter Pzl P11
Tactical bombers are equipped with machineguns, sometimes autocannons and (multiple) bombs, which have a high explosive and armor-penetrating firepower value. They may be used to attack infantry, support weapons, soft-skin vehicles, and destroy enemy armored vehicles and buildings or fortifications. Tactical bombers may attack one target at a time when using bombs. They also may strafe the enemy with their machine guns like fighter planes do.
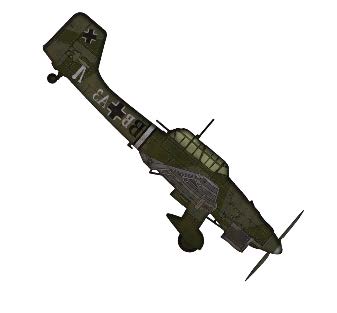
German JU87 tactical bomber.
How to move units
Units in Burst of Fire move in a variety of ways depending on the unit type – by rolling one or multiple six sided dice or by a default amount of inches / centimeters. One thing always stays the same though: One move equals one action.
While infantry and support weapons will always move the same (short) distance, vehicles have to roll a specific number of D6. The amount of D6 you have to roll is determined by the speed of the unit and can be found in the army lists.
There are four individual types of movement: by foot, tracked, wheeled, on horseback. For planes, special rules apply. They sweep over the battlefield and always leave it once their task is done. So no need to roll the dice or use a ruler here.
Units and movement
| Unit type | Range single move | Note |
| Soldiers on foot | 10cm / 4in | May move at the double. |
| Soldiers on foot with heavy gear | 10cm / 4in | May not move at the double |
| Support weapons | 5cm / 2in | May not move at the double |
| Vehicles & Horses | 1D6 to 8D6 | May move at the double |
| Vehicles towing support weapons | Range cut in half | May move at the double. Towing vehicle has to match towed support weapon. |
| Planes | Unlimited range | Do not move by rolling D6s but sweep over the battlefield and then stay off board. |
Movement on different types of terrain
On the battlefield, your units will encounter different types of terrain. Depending on the individual type of movement (by foot, tracked, wheeled, on horseback), your units will gain bonuses or suffer penalties on their range of movement. Some terrain types may not be entered by specific units at all.
The following table summarizes all types of movement, bonuses and penalties.
Movement and terrain
| Type of terrain | On foot | Wheeled | Tracked | Horse |
| Plains | no bonus or penalty | Abandon lowest die | Add highest die | Add highest die |
| Light Woods | no bonus or penalty | Abandon 2 highest dice | Abandon lowest die | no bonus or penalty |
| Dense Woods | No double move | May not enter | May not enter | No double move |
| Hills | No double move | Abandon 2 highest dice | Abandon 2 lowest dice | Abandon lowest die |
| Steep Hills | No double move | 1D6 per turn | 1D6 per turn | 1D6 per turn |
| Crops and rough ground | no bonus or penalty | Abandon 2 lowest dice | Abandon lowest die | Abandon lowest die |
| Cobblestone and paved roads | no bonus or penalty | Add 2 highest dice | Add highest die | Add lowest die |
| Dirt roads | no bonus or penalty | no bonus or penalty | Add lowest die | Add lowest die |
| Rivers | Limit speed to 5cm / 2in | May not enter | May not enter | Limit speed to 5cm / 2in |
How to cross obstacles with infanry
Sometimes, natural and artificial obstacles have to be crossed during combat – maybe a hedge or a stone wall.
There are three different types of obstacles in Burst of Fire: low obstacles (waist high), medium obstacles (soldier height), tall obstacles (more than a soldier height).
To cross an obstacle, roll a D6. If the test is failed, the infantry unit is spent for the turn and may try agin next turn. If the obstacle is crossed, the unit is also spent for the turn.
Infantry crossing obstacles
| Obstacle height | Needed roll to pass (1D6) |
| Small | 2,3,4,5,6 |
| Medium | 3,4,5,6 |
| High | 4,5,6 |
Note: Soldiers cannot fire their weapon(s) while crossing an obstacle. They may spend an action to cross the obstacle successfully and then fire. They may not fail the attempt and then fire.
How to cross rivers
Infantry and horses may cross rivers without using a bridge or any additional equipment like boats. If they do so, these units may only move at a limited range of 5cm / 2in per turn.
Note: Units crossing rivers will be an easy target for the enemy and will have a negative cover level of -2. (See movement on different types of terrain)
AFVs breaking through obstacles
Armored Fighting vehicles may break through wooden structures and obstacles like walls and hedges.The player has to roll 2D6 to see if the attempt is successful. This is the only action the unit may perform in this turn.
AFVs breaking through obstacles
| Obstacle type | Needed roll to breakthrough (2D6) |
| Small (hedges, fences, p.e.) | 4 or higher |
| Medium (breast high stone walls, sheds p.e.) | 6 or higher |
| Big (wooden houses, stone walls taller than a soldiers height p.e.) | 8 or higher |
| Very big (Massive structures like stone houses p.e.) | 10 or higher |
Freeing stuck AFVs
If the test fails, the unit is stuck and marked with a stuck token.
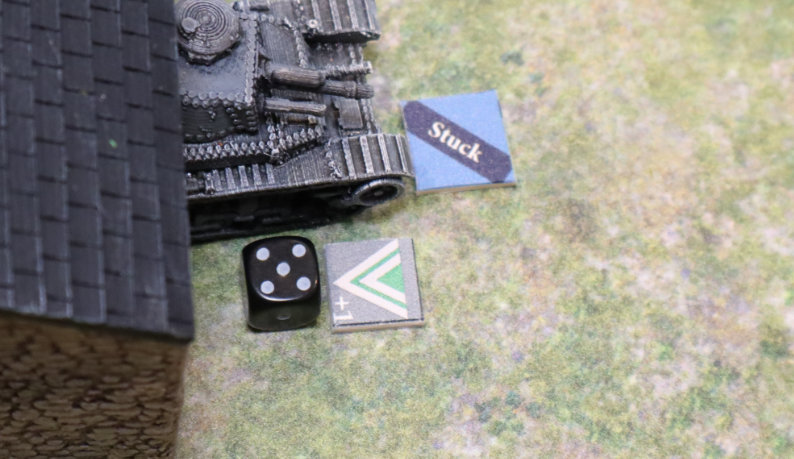
This Pz38t has got stuck while trying to break through a stone structure.
The crew may try to free the vehicle once per turn. To do so, roll 2D6. When the result shows 6 or lower, the vehicle is released and may move next turn.
Freeing stuck vehicles
| Effect | Needed roll (2D6) | Consequence |
| Vehicle freed | 6 or lower | Vehicle may not move. Retry next turn. |
| Vehicle still stuck | 7 or higher | Vehicle may move next turn |
Protect your units & take cover!
Soldiers, support weapons and vehicles may take cover in or behind structures. Cover offers protection from enemy rounds and a boost in morale.
Take cover
| Cover level | Penalty attacker | Morale bonus unit in cover |
| Soft | -1 | +1 |
| Medium | -2 | +2 |
| Hard | -3 | +3 |
- Hills and wooden structures, such as buildings and trees, also gun shields offer soft cover.
- Stone structures and sandbags offer medium cover.
- Bunkers are the only structures that offer hard cover.
Cover bonuses may add up. P.e. When a unit is behind sandbags (medium cover) located on a hill (soft cover) it will receive a cover bonus of 3. So every enemy unit firing at the unit in cover will suffer a penalty of -3 on every attack roll.
- Units firing at a target in soft cover will suffer a -1 on every attack roll.
- Units firing at a target in medium cover will suffer a penalty of -2 on every attack roll.
- Units firing at a target in hard cover will suffer a penalty of -3 on every attack roll.
- Units in soft cover gain a morale boost of +1
- Units in medium cover gain a morale boost of +2
- Units in hard cover gain a morale boost of +3
Note:
- Vehicles or wrecks may be used as cover. Softskin wrecks or vehicles grant soft cover while armored vehicles grant medium cover.
- Burning wrecks or vehicles may not be used as direct cover but block line of sight.
Taking cover in buildings
A sniper is taking cover in a stone building. The stone building offers medium cover. Each attacker will suffer a -2 when attacking the sniper. At the same time the sniper is on the 2nd floor of the building and will gain a +1 elevation bonus on every attack. Also, he will gain a +2 on every morale check he has to pass.
- Infantry in buildings will be harder to spot and receive a bonus on cover (depending on cover level), morale (depending on cover level) and melee (+1).
- One support weapon (a medium machine gun p e.) or 2 handheld weapons (a carbine and a submachine gun p.e ) may fire from one single window.
- Also, when at least on the 2nd floor, units will receive an elevation bonus of +1 on every attack roll
- AFVs may also try to take cover beside or in buildings. (See AFVs breaking through structures)
Creating additional cover for AFVs
AFVs may seek additional cover in woods, buildings, on hills or behind walls. The cover level is added to the armor of each AFV. So when a tank has 4 armor on the left side and the side is covered by a stone building, the tank will have an armor level of 6 (4 armor +2 hard cover). AFVs may even try to take additional cover by breaking into wooden and stone buildings.
This German Pz38t is taking additional cover in a stone building. He will add a +2 on his side, rear and top armor. The armor level for the front will stay the same.
How to hide infantry units and officers
The closer the enemy gets, the easier his units can be hit. Infantry and ranking officers may hide behind cover, in woods, houses or even in hills. To do so, they have to spend one action.They are then marked with a hide token. These units may use an action to unhide and another one to shoot.
Hiding infantry cannot actively engage the enemy without unhiding. Also hidden units may only be spotted by units that are in close range.
Special rule: Snipers may ignore hide tokens, spot hiding units also from far and medium range and shoot at them if spotted successfully.
Ambush
AT and AA guns may try to ambush enemy units in order to strike first. When in ambush mode, these units may only be revealed and attacked from super close range. They are marked with an ambush token before the game starts. As soon as these units have been activated once they will loose their ambush token.
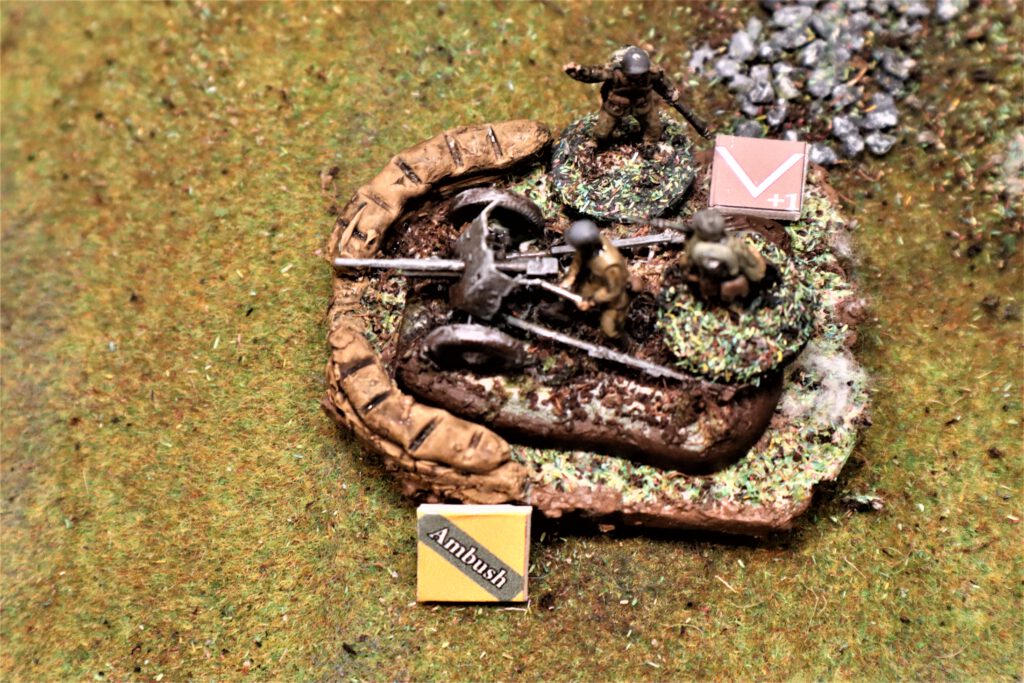
This anti tank gun is in ambush mode. It may not be spotted by units from far or medium range. As soon as the gun has attacked it will loose the ambush token. It also looses its ambush token when an enemy unit gets in close range.
Note: AT and AA guns may not go on ambush mode during a game.
Structures catching fire
Structures provide cover but also bear the danger of catching fire. Ever time a structure is shot at with HE shells there is a chance that the structure will burn. When close to or in a structure catching fire, all units hiding in or behind it have to bail and/or pull back at least 10cm / 4in. Units pulling back will lose their actions for the current turn.
When being hit with HE, roll 2D6 to see if the structure catches fire. Every doublet on the dice will set the structure on fire.
Table structures catching fire
| Roll to catch fire (2D6) | Consequence |
| Any doublet (1&1, 2&2...) | All units in or close to the structure have to bail and/or pull back at least 10 cm / 4 in. These units may not be activated for the turn |
Special rule: flamethrowers will set every building/structure on fire with the first blow.
Mark structures that caught fire accordingly. These structures may not be entered.
Line of Sight
A clear line of sight is key when attacking enemy units. But in combat there are often structures and buildings blocking line of sight. Units covered by these structures and buildings may not be shot at by small caliber weapons or vehicles/support weapons using HE rounds.
To get a clear line of sight this sniper has to pop around the corner of a stone building.
Tanks that are not in a clear line of sight may be shot at with armor piercing rounds (AP), when a part of their body or turret is visible or they have been previously spotted by friendly units. They gain an armor bonus. (See creating additional cover for AFVs).
Note: Units that are more than one 5 cm / 2 in deep into the woods or 5 cm / 2 in behind hedges, cannot be seen.
How does line of sight work for artillery and planes?
- Artillery may shoot over obstacles due to their higher arching trajectory.
- Planes may drop bombs on units behind obstacles.
- Friendly units may spot for artillery.
Arc of fire
- (Armored) vehicles with turrets and support weapons have a firing arc of 90 degrees.
- Infantry can fire at 180 degrees without having to pivot.
- Fighter planes and tactical bombers may strafe units in a corridor that equals their wingspan.
- (Armored) vehicles without a turret and support weapons may only fire at an angle of 60 degrees without pivoting.Note: If units do not meet the angle to hit the enemy, they have to spend one action and pivot or turn themselves or their turret.
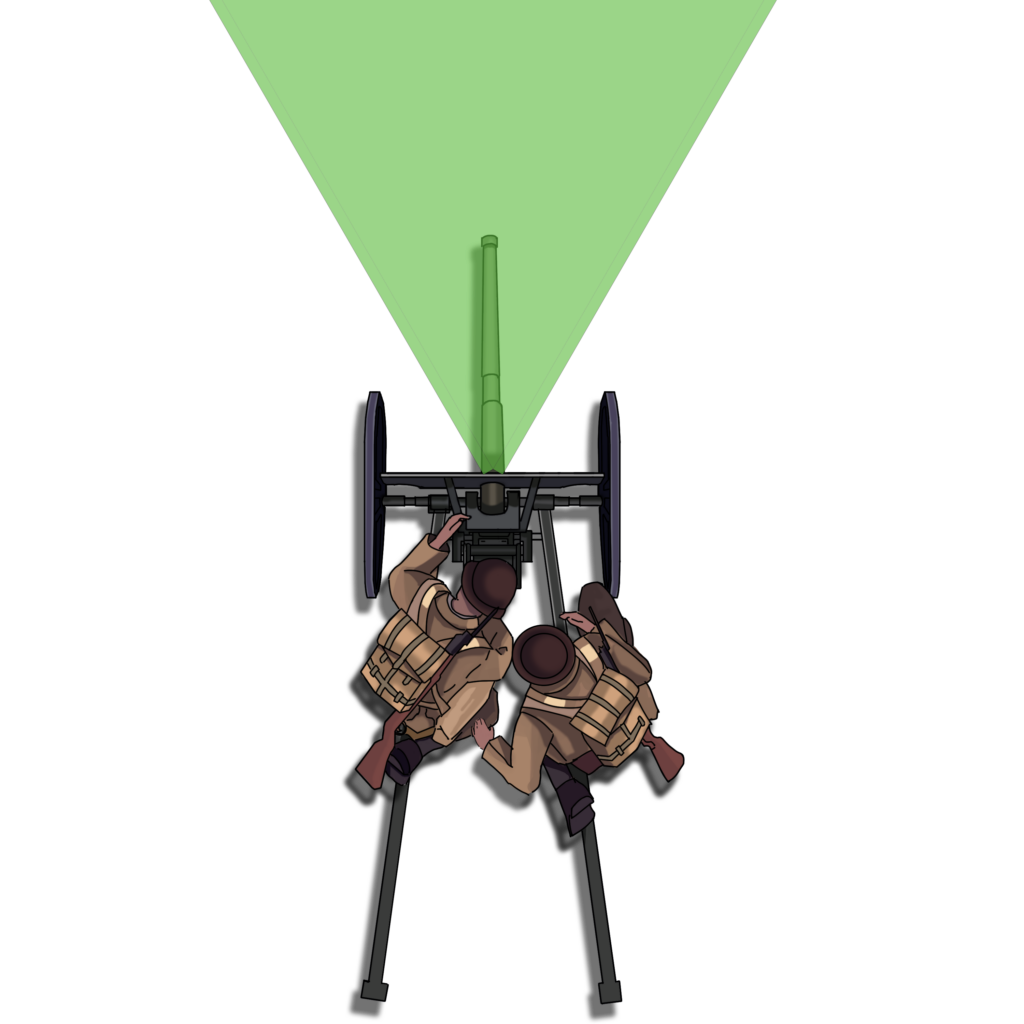
Support weapons may fire in a arc of 60 degrees without pivoting

Tanks with turrets may fire in a arc of 90 degrees without pivoting or spending an action to turn the turret.
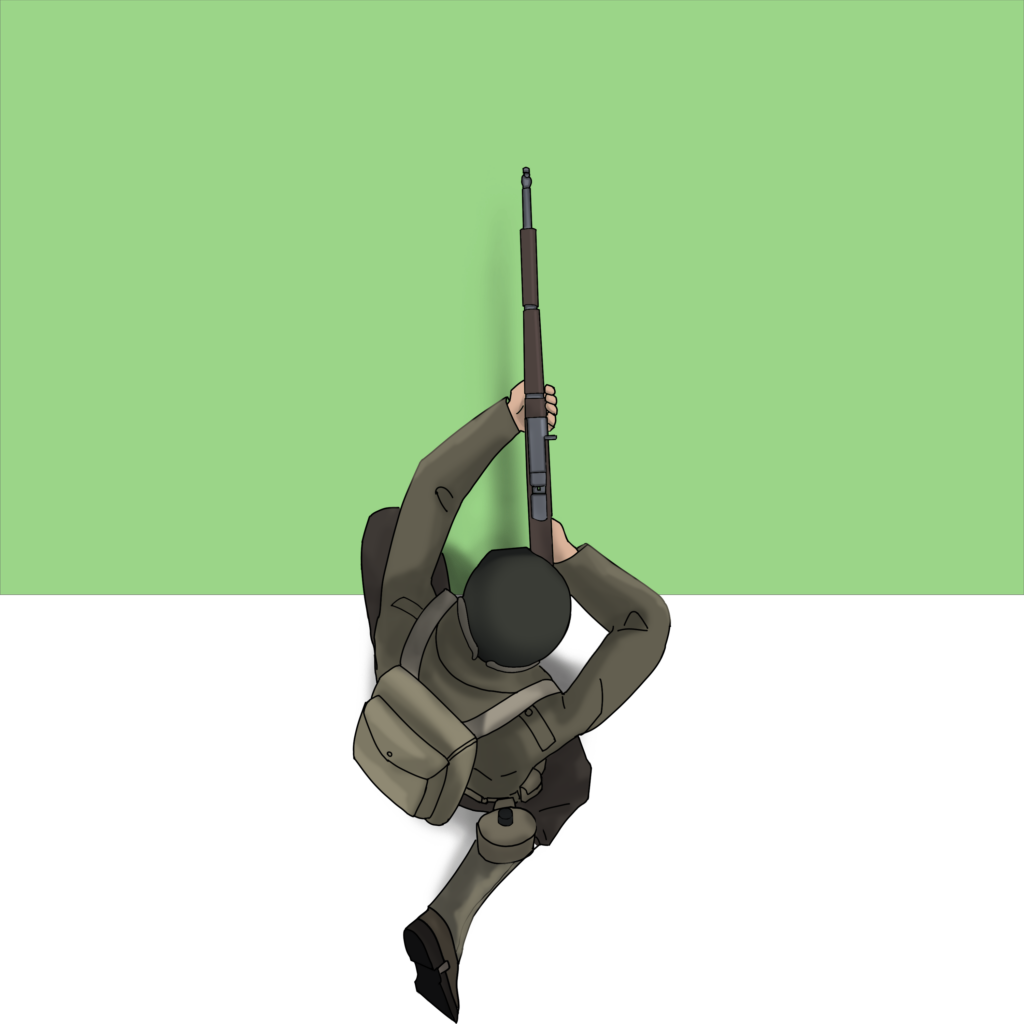
Infantry may fire in a arc of 180 degrees without spending an action to pivot.
Planes may fire at enemies with their mgs and autocannons within their wingspan.
Range (or how far the enemy is away) matters!
Because of the scale Burst of Fire operates, most of the weapons do not have limitations on maximum range. A Karabiner 98, for example, had an effective range of 500 meters, while games in Burst of Fire rarely exceed 200 meters of distance. However, artillery pieces do have a minimum range of 50 cm / 20 in.
In Burst of Fire the closer your troops advance to the enemy positions, the easier it will be for them to hit enemy soldiers and vehicles. There are three range bands in Burst of Fire: far, medium and close range.The closest two offer bonuses for attacking units. General range bands with bonuses for all weapons except grenades:
Table range bands
| Range band | Distance | Attack bonus |
| Far | More than 100cm /40in | 0 |
| Medium | Less than 100cm / 40in | +4 |
| Close | Less than 50cm / 20in | +8 |
How to resolve combat
Combat in Burst of Fire is always resolved in multiple steps.
- Calculate range band
- Spot roll (if needed)
- Aim/accuracy roll
- Drift roll (if needed)
- Calculate attack roll (add/subtract range and level bonus/penalty)
- Perform attack roll
- Calculate collateral damage and blast radius (if needed)
- Perform effect roll
- Place effect tokens
- Adjust Combat Score (if required)
- Perform morale check
- Place effect tokens
- Adjust Combat Score (if required)
Effects of hits and morale checks are symbolized by the corresponding tokens the player will place next to the unit. Some of the tokens have a permanent character, while some of them only last for a turn. (See Appendix tokens)
Here is a summary of the dice you need to roll during attacks.
Table Dice rolls during combat
| Type | Dice rolled | Note |
| Spot Roll | 1D6 | Only needed when target is not in close range or in the open |
| Accuracy / Aim Roll | 4D6 | Only needed for artillery or any kind of grenades |
| Drift Roll | 8D6 | Only needed for artillery or any kind of grenades |
| Attack Roll | 4D6 | Must match or be below attack value of the weapon. Add bonuses. Subtract penalties. |
| Effect Roll | 2D6 | Only applies when enemy unit is hit |
| Morale Check | 2D6 | Only applies when unit is hit. Must match or be below force morale rating. Add bonuses. Subtract penalties. |
How to spot the enemy
Enemy units that are not in the open or in close range have to be spotted first, before they may be attacked. Generally speaking it is harder to spot infantry than to spot support weapons, vehicles and armored fighting vehicles. The closer the target is the easier it is to spot. Also the lower the cover level is the easier the enemy unit can be spotted.
Table spotting the enemy
| Type of cover and range | Roll to spot infantry (1D6) | Roll to spot vehicles and support weapons |
| soft/medium | 3 and more | 2 and more |
| soft/far | 4 and more | 3 and more |
| medium/medium | 4 and more | 3 and more |
| medium/far | 5 or 6 | 4 and more |
| hard/medium | 5 or 6 | 4 and more |
| hard/far | 6 | 5 or 6 |
The spot roll is part of the attack action. If the attacker fails to spot the enemy he may not engage the target. The combat sequence is broken up and one action is spent. A successful spot plus firing at the target is also worth one action.
Attack roll
The attack roll uses 4D6 to determine if the enemy unit is hit and, in some cases, how many enemy units are hit (see chapter range matters concerning machineguns and autocannons). The number of the attack roll has to be below the number of the attack value shown on the unit card. Penalties and bonuses are subtracted from or added to the number that is needed on the roll.
Table calculating the attack roll: bonuses and penalties
| Situation | Bonus (+) added to or penalty (-) subtracted from the needed roll |
| Elite soldier or crew | +1 |
| Squad leader | +1 |
| Officer nearby / officer in vehicle | +2 |
| Target in medium range | +4 |
| Target in close range | +8 |
| Conscript level soldier or crew | -1 |
| Attacker frightened | -1 |
| Cavalry firing from horseback | -1 |
| Target in soft cover | -1 |
| Attacker injured | -2 |
| Target in medium cover | -2 |
| Infantry firing from (armored) moving vehicle or horseback | -2 |
| Attacker targeted by covering fire | -2 (per enemy giving covering fire) |
| Target in hard cover | -3 |
| Target covered by smoke | -5 |
Effect roll
The effect roll happens when a unit is hit and determines the severity of a hit. The effect is determined by rolling 2D6. Each effect changes the condition of a unit and may come with penalties on further attacks and morale checks. Effects are symbolized by effect tokens. (See Appendix tokens)
Effect of hits on infantry, vehicle crews and support weapon crews
Table Effects of hits on infantry in combat
| Roll (2D6) | Effect | Consequence |
| 2,5,8,11 | Killed |
|
| 3,6,9,12 | Injured |
|
| 4,7,10 | Suppressed |
|
Note: While effects on infantry apply to a single soldier, effects on crew members are played cumulatively and are not attributed individually. This means you roll 2D6 until you have reached the number of crew members possibly effected. Every two injury tokens lead to a death of one crew member. Every two suppressed tokens will make one crew member surrender. And so on.
Summary effects small caliber hits on softskin transport vehicles
Table small caliber hits on softskin transport vehicles
| Roll (2D6) | Effect | Consequence |
| 2,6 | Vehicle stops and unloads passengers |
|
| 3,7,10 | Vehicle breaks down |
|
| 4,8,11 | Driver panics |
|
| 5,9,12 | Passenger killed |
|
Summary effects small caliber hits on horses
Table small caliber hits on horses
| Roll (2D6) | Effect | Consequence |
| 2,6,9 | Shell whizzes by, horse panics |
|
| 3,7,10,12 | Horse injured |
|
| 5,8,11 | Horse dies |
|
Summary small caliber hits on abandoned softskin vehicles
Table effects of small caliber hits on abandonded softskin vehicles
| Roll (2D6) | Effect | Consequence |
| 2,4,6,8,10,12 | Minor damage | No consequence |
| 3,5,7,9,11 | Vehcile breaks down |
|
Summary effects weapons with HE value vs softskin vehicles
Table Hits with high explosive (HE) ammo on softskin vehicles
| Roll (2D6) | Effect | Consequence |
| 2,6 | Shell explodes close to the vehicle, driver panics |
|
| 3,7,10 | Major damage, vehicle breaks down |
|
| 4,8,11 | Vehicle explodes |
|
| 5,9,12 | Passenger killed |
|
High explosive hits on abandoned softskin vehicles
Table high explosive (HE) ammo vs. abandoned softskin vehicles
| Roll (2D6) | Effect | Consequence |
| 2,6 | HE shell explodes close by and causes minor damage |
|
| 3,7,9,11,12 | Vehicle breaks down |
|
| 4,8,10 | Vehicle explodes |
|
High explosive hits on horses
Table high explosive hits on horses
| Roll (2D6) | Effect | Consequence |
| 2,6 | Shell whizzes by, horse panics |
|
| 3,7,9,11 | Horse (and rider) injured |
|
| 5,8,10,12 | Horse (and rider) dead |
|
MGs and ARs vs. AFVs
Machine guns and automatic rifles may try to stop armored vehicles that are in super close range by shooting at the front of the vehicle.
This tactic was often used by allied troops in World War Two. They aimed their fire at the viewing slots for the tank crews. In this game, the better armored the vehicle, the harder it will be to make the enemy vehicle back up.
When the attempt to stop the AFV is successful, the vehicle may not move in the current turn. The vehicle may be activated next turn and is not hit with any further penalties. The crew will not have to check for morale.
Like other attacks, this one is resolved by rolling 2D6. This tactic will not work on vehicles in close or regular range.
Table MGs and ARs trying to stop AFVs
| Front armor target | Roll (2D6) | Effect | Consequence |
| 1 to 3 | 6 or lower | Vehicle stops |
|
| 4 to 6 | 4 or lower | Vehicle stops |
|
| more than 6 | 3 or 2 | Vehicle stops |
|
Effects armor piercing rounds on AFVs
Table (aimed) hits by armor piercing rounds on AFVs
| Roll (2D6) | Effect | Consequence |
| 2,7 | Ammo storage hit / vehicle explodes |
|
| 3,8,12 | Armor pierced |
|
| 4,9 | Immobilized |
|
| 5,10 | Crew member killed |
|
| 6,11 | Gun damage |
|
| Successfully aimed hit on the tracks/tires (attack roll with penalty of -2) | Immobilized |
|
| Successfully aimed hit at turret (attack roll with a penalty of -3) | Turret jam |
|
HE hits, destroying support weapons.
Weapons with HE value aiming at support weapons do have a chance of not only harming the crew but also destroying the support weapon with a single shot. Suppose the attacker manages to score a hit by rolling a number lower or equal to the HE value. In that case, the player may roll 2D6 to see if the support weapon has taken damage in addition to the effect roll on the weapon crew.
Table HE hits on support weapons
| Roll (2D6) | Effect | Consequence |
| 2,4,6,8,10,12 | Minor damage |
|
| 3,5,7,9,11 | Support weapon destroyed |
|
Artillery, hand grenades, Panzerfausts, Panzerschrecks & Bazookas: accuracy & drift
An accuracy roll is mandatory when using artillery, hand grenades or handheld AT weapons armed with hollow charges and rockets like the Panzerfaust, Panzerschreck and Bazooka. During combat grenades or shots from recoilless rifles as the panzerfaust may be misplaced by soldiers handling them. Artillery like mortars mostly did not have good accuracy during World War 2.
The accuracy/aim roll will determine if the targeted location is hit by the shell, rocket or grenade. The accuracy/aim roll is performed with 4D6.
Everytime the accuracy roll fails it is followed by the drift roll, using 8D6. Because if the needed accuracy is not met, the explosion may harm other enemies or even friendly units. Accuracy and drift roll are followed by the attack roll to see if the explosion will harm the target(s).
Note: bonuses, for elite soldiers and crews p.e., as well as penalties, for conscript soldiers or crews handling the weapon, will be added to or subtracted from the accuracy roll and not from the attack roll.
How to throw grenades
If a soldier carries any kind of grenade, he may use one of his actions to throw the grenade at a target. Roll 4D6 to see if the target square is hit. Hand grenades have a limited range. The maximum range of throwing a grenade on point is 25cm /10 in which equals about 35 metres/115 feet in 20mm scale. Targets within 5cm / 2in are hit automatically.
Grenades may be hurled in vehicles, vehicle hatches, windows and over open top cover.
Aim/accuracy rolls and range bands grenades:
Table accuracy roll grenades
| Distance | Needed roll (4D6) |
| less or equal 5cm / 2in | Auto hit |
| 5 to 10cm / 2 to 4in | 18 or lower |
| 10 to 15cm / 4 to 6in | 16 or lower |
| 15 to 20cm / 6 to 8in | 14 or lower |
| 20 to 25cm / 8 to 10in | 12 or lower |
Grenade drift
If misplaced, the grenade will drift and may even hurt friendly troops. Drift distance is determined by rolling 1D6. Roll 8D6 to determine drift direction. The drift direction table is the same for all
Table drift distance grenades
| Roll (1D6) | Drift distance |
| 1,2 | 5cm / 2in |
| 3,4 | 10cm / 4in |
| 5,6 | 15cm / 6in |
Table drift direction hand grenades, mortar & artillery
| Roll (8D6) | Drift direction |
| 8,16,24,32,40 | North |
| 9,17,25,33,41 | Northeast |
| 10,18,26,34,42 | East |
| 11,19,27,35,43 | Southeast |
| 12,20,28,36,44 | South |
| 13,21,29,37,45 | Southwest |
| 14,22,30,38,46 | West |
| 15,23,31,39,47 | Northwest |
| 48 | Reroll |
Anti personnel grenades
Anti-personnel grenades have a HE value that has an effect on all soldiers in the blast radius. If the square is hit, all soldiers have to check if they are hit. To do so roll 4D6. The outcome has to be below or a match to the HE value of the grenade. Then roll for the hit’s effect. Units that have been hit have to pass a morale check.
Throwing antipersonnel grenades in vehicles and bunkers
Soldiers can drop a grenade in the hatch of an AFV or try to hit the open top of a vehicle. Roll 4D6 to see if the attempt was successful.
To hit an open top vehicle that is currently standing still, the accuracy roll for throwing grenades in general applies. A vehicle stands still as long as it did not move during the current turn.
Table accuracy roll grenades
| Distance | Needed roll (4D6) |
| less or equal 5cm / 2in | Auto hit |
| 5 to 10cm / 2 to 4in | 18 or lower |
| 10 to 15cm / 4 to 6in | 16 or lower |
| 15 to 20cm / 6 to 8in | 14 or lower |
| 20 to 25cm / 8 to 10in | 12 or lower |
To hit an open top vehicle that has been on the move use the following table.
Table accuracy roll for throwing grenades in open top vehicles
| Distance | Needed roll (4D6) |
| less or equal 5cm / 2in | 14 or lower |
| 5 to 10cm / 2 to 4in | 12 or lower |
| 10 to 15cm / 4 to 6in | 10 or lower |
| 15 to 20cm / 6 to 8in | 8 or lower |
| 20 to 25cm / 8 to 10in | 6 or lower |
Far more difficult it is for soldiers to run up to a tank, open a hatch and drop a grenade into the vehicle. For that purpose the soldier with the grenade has to be in single move distance (equal or below 10cm / 4in) of the targeted armored vehicle. The further the soldier will have to run the more exhausted and stressed he will be. Also, the targeted vehicle has to stand still. A vehicle stands still as long as it did not move during the current turn. To drop a grenade into an AFV standing still use the following table.
Table accuracy roll for dropping a grenade into an AFV that is standing still
| Distance | Needed roll (4D6) |
| less or equal 5cm / 2in | 12 |
| 5 to 10cm / 2 to 4in | 10 |
Optional rule for dropping grenades into AFVs – grenade bouncing: If the soldier has not hit the hatch, roll 2D6. If 6 or lower, the grenade bounces right back at the soldier’s feet. Roll 2D6 to check the effect on the soldier and another 2D6 for a morale check afterwards.
Note: The rules for throwing an anti personnel grenade in AFVs with closed tops also apply to throwing grenades in bunkers.
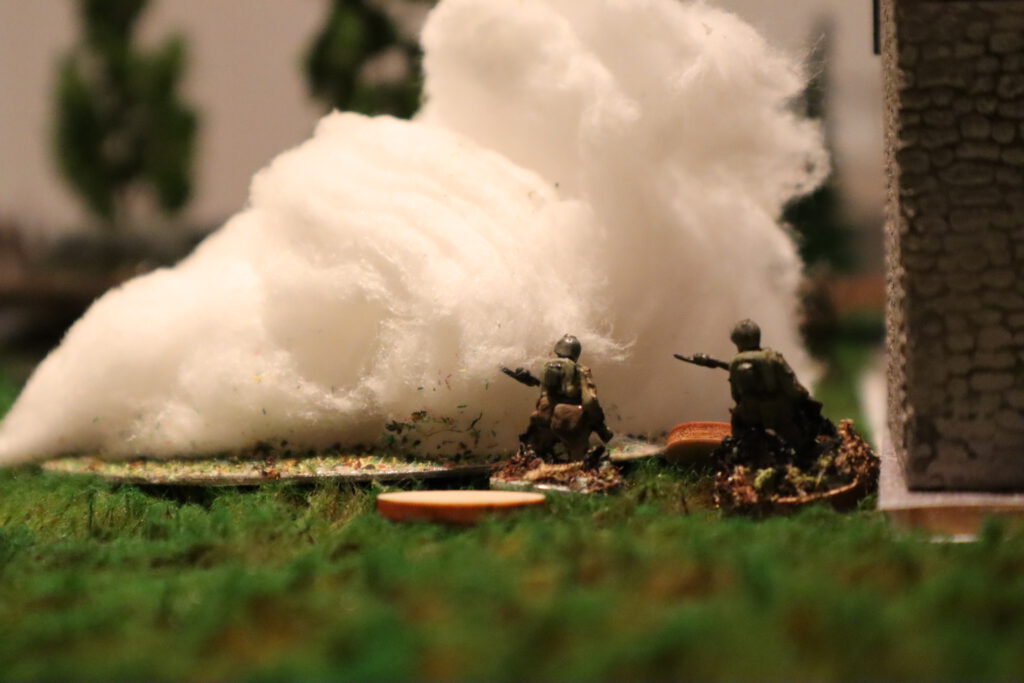
Smoke grenades
Smoke grenades work like anti-personnel grenades, except they conceal friendly units instead of harming enemy units. Once placed, the smoke covers an area of about 15 x 15cm / 6 x 6in. Place smoke markers accordingly. The effect of smoke grenades lasts for 3 turns. Mark the number of turns the effect is already lasting with a token or die.
Units hiding in/behind smoke can hardly be seen. Attackers may fire at a penalty of -5 on each attack roll into the smoke.
AT Grenades and satchel charges
AT Grenades and satchel charges are heavier than anti-personnel or smoke grenades. Therefore, their range is even more limited. When misplaced, roll for grenade drift. When the target is hit, the attack roll determines if the enemy armored unit is penetrated.
The roll on 4D6 has to match or be below the AP value of the grenade satchel charge. After that, the effects on the vehicle (see AP vs. AFVs) and the morale of the crew have to be determined (see chapter morale checks).
Table accuracy roll AT grenades and satchel charges
| Distance | Needed roll (4D6) |
| less or equal 5 cm / 2in | Auto hit |
| 5cm to 10cm / 2 to 4in | 14 |
| 10cm to 15cm / 4 to 6in | 12 |
Like other weapons with HE value, AT grenades and satchel charges may also be used in order to destroy enemy structures.
The grenade is well placed and goes off…
When placed successfully, the grenade goes off. No attack roll is needed to see if the crew members or passengers were hit. Simply because it is highly unlikely for a grenade to not have an effect on passengers or crew member in such close quarters. Roll 2D6 for effect on each crew member or passenger. All crew members still alive have to pass a morale check. To perform a morale check roll 2D6. Effects on crew members are played cumulatively and are not attributed individually. This means you roll 2D6 until you have reached the number of crew members possibly effected. Every two injury tokens lead to a death of one crew member. Every two suppressed tokens will make one crew member surrender. And so on.
Additionally, when the open top or inside of a vehicle is hit by a grenade, roll 2D6 for effect and check the table for HE vs. softskin vehicles. This is the only time this table will also apply to armored vehicles. Because on the inside both types of vehicles are soft so to say.
Artillery & Mortars
Artillery and mortars were not exactly accurate during World War Two.To be fair, some of it depended on the model of the weapon itself. To make the game more accessible, in Burst of Fire, accuracy for mortars and artillery will be handled similarly. In Burst of Fire artillery and mortars do have a minimum range of 50cm/20in. The farther away the target, the harder to hit exactly. If hit by a bigger shell, the outcome will be most likely disastrous for men and vehicles alike.
Table Accuracy roll artillery & mortar fire on targets standing still
| Distance | Needed roll (4D6) |
| 50 to 75cm / 20 to 30in | 16 or lower |
| 75 to 100cm / 30 to 40in | 14 or lower |
| 100 to 125cm / 40 to 50in | 12 or lower |
| more than 125cm / 50in | 10 or lower |
Artillery pieces and mortars may fire at units that are not in direct line of sight. Their shells can possibly harm multiple units. All units in the blast radius, depending on the shell size, have to check for possible hits and effects. Every unit in the blast radius has to pass a morale check.
When not aimed correctly, the shell will drift and may even hurt friendly troops. Mortar and artillery drift is determined by rolling a D6. Drift direction is determined by rolling 8D6.
Artillery & mortar drift
Table drift direction hand grenades, mortar & artillery
| Roll (8D6) | Drift direction |
| 8,16,24,32,40 | North |
| 9,17,25,33,41 | Northeast |
| 10,18,26,34,42 | East |
| 11,19,27,35,43 | Southeast |
| 12,20,28,36,44 | South |
| 13,21,29,37,45 | Southwest |
| 14,22,30,38,46 | West |
| 15,23,31,39,47 | Northwest |
| 48 | Reroll |
Table drift distance artillery shells
| Roll (1D6) | Drift distance |
| 1 | 5cm / 2in |
| 2 | 10cm / 4in |
| 3 | 15cm / 6in |
| 4 | 20cm / 8in |
| 5 | 25cm / 10in |
| 6 | 30cm / 12in |
Panzerfausts, Bazookas and Panzerschrecks
Panzerfausts, Bazookas and Panzerschrecks are considered as side weapons in Burst of Fire. They may be carried by infantry and be used to destroy or at least damage enemy armored vehicles. While the Panzerfaust was a recoiless rifle armed with a self propelled warhead, the bazooka and its german counterpart the Panzerschreck were also recoilless rifles but in fact handheld rocket launchers. During World War Two these weapons were limited in range and accuracy.
All of these weapons had limited range. Here is a look at their maximum effective range.
Table maximum range Panzerfausts, Panzerschrecks and Bazookas
| Weapon | Maximum effective range |
| Panzerfaust 30 (also Faustpatrone) | 20cm / 8in |
| Panzerfaust 60 | 40cm / 16in |
| Panzerfaust 100 | 75cm / 30in |
| Bazooka | 75cm / 30in |
| Panzerschreck | 110cm / 44in |
Like with hand grenades or artillery the attacker has to perform an accurracy roll (4D6) first to see if the shooter is able to correctly aim at the target. Like with artillery and handgrenades bonuses for veterancy are added.
Table accuracy roll Panzerfaust
| Distance to target | Needed roll |
| below 15cm / 6in | 20 |
| 15 to 30cm / 6 to 12in | 18 |
| 30 to 45cm / 12 to 18in | 16 |
| 45 to 60cm / 18 to 24in | 14 |
| 60 to 75cm / 24 to 30in | 12 |
| more than 75cm | 10 |
Bazookas and Panzerschrecks were more accurate than Panzerfausts but also had their limitations. In Burst of Fire Panzerschrecks and Bazookas are handled likewise in their effectivity because the Schreck was heavily inspired by the american Bazooka M1.
Table accuracy roll Panzerschreck and Bazooka
| Distance to target | Needed roll (4D6) |
| below 30cm / 12in | 20 |
| 30 to 45cm / 12 to 18in | 18 |
| 45 to 60cm / 18 to 24in | 16 |
| 60 to 75cm / 24 to 30in | 14 |
| more than 75cm | 12 |
Every successful accuracy roll is followed by an attack roll (2D6). If the attack roll is successful the effect roll follows. Use table for effects of hits by armor piercing rounds vs. armored vehicles.
Every unsuccessful accuracy roll is followed by a drift (8D6) roll.
Table drift direction Panzerfausts, Panzerschrecks and Bazookas
| Roll (8D6) | Drift direction |
| 4,8,12,16,20,24,28,32,36,40,44 | Shot missed to the right side of the target |
| 5,9,13,17,21,25,29,33,37,41,45 | Shot missed to the left side of the target |
| 6,10,14,18,22,26,30,34,38,42,46 | Aimed too low, explosion in front of the target |
| 7,11,15,19,23,27,31,35,39,43,47 | Aimed too high, shell will not explode on the map |
| 48 | Reroll |
Like with hand grenades the drift distance is determined by rolling a D6.
Table drift distance Panzerfausts, Panzerschrecks and Bazookas
| Roll (1D6) | Drift distance |
| 1,2 | 5cm / 2in |
| 3,4 | 10cm / 4in |
| 5,6 | 15cm / 6in |
In case the rocket or hollow charge drifts on the position of an armored vehicle use its AP value to determine if the unit is hit. On soft targets use the HE value.
Note: This is no action movie, so no active firing a Bazooka or Panzerfaust at single soldiers. It may happen inadvertedly though when a Panzerfaust, Panzerschreck or Bazooka is misfired.
Ammo for Panzerfausts, Panzerschrecks and Bazookas
Panzerfausts are disposables. They may be fired once per game. A soldier may carry multiple Panzerfausts.
Bazookas and Panzerschrecks have a maximum ammo of three shots per game.
Flamethrowers
Flamethrowers are powerful weapons against infantry and tanks. They present the opportunity to effectively attack multiple (entrenched) units at the same time. Their blast radius is similar to grenades. (See table HE blast radius)
The attacker may use flamethrowers to set cover like buildings or woods on fire or destroy key structures like wooden bridges to keep the enemy from advancing. If the attacker intends to do so, no attack roll is needed. The attacker just has to spend one action on setting the target on fire.
Other than that, flamethrowers are handled like any other primary handheld weapon. They have a blast radius similar to grenades. So every unit in a radius of 5cm / 2in of the targeted unit has to check for a possible hit and effect. All units in the blast area have to check for morale.
If used against soldiers manning bunkers, no attack roll is needed. All soldiers in the bunker have to check for effect and morale.
However, flamethrowers do come with a restricted range of 40cm /16in.
HE blast radius and collateral damage.
Multiple units may be affected by exploding grenades, shells, or bombs. The bigger the shell, the bigger the blast radius. All infantry units and softskin vehicles in the blast radius – no matter if friend or enemy – have to roll 4D6 to determine if hit. All infantry units and softskin vehicles in the blast radius have to pass a morale check.
The attacker rolls 4D6 for every possibly hit unit in the blast radius. Like in other attack rolls the rolled number has to match or be below the attack value after adding bonuses and subtracting penalties. Suppose the enemy is hit, then the hit’s effect has to be determined.
Table blast radius
| Caliber of the HE shell | Blast radius |
| Handgrenades / 20mm (flamethrowers likely treated) | 5cm / 2in |
| 37 to 47mm (satchel charges, geballte Ladung and mortar shells likely treated) | 10cm / 4in |
| 75 to 88mm (exploding vehicles likely treated) | 20cm / 8in |
| Calibers above (bombs likely treated) | 25 cm / 10 in |
Detailed informations calibers units use and their blast radiuses are part of the unit descriptions that come with the unit cards.
Machine guns and autocannons in combat
Automatic rifles, submachine guns, light / medium / heavy machine guns and 20 mm cannons may fire twice per turn to simulate their higher rate of fire. Because of the higher rate of fire for machine guns and autocannons lower ranges also come with the possibility of hitting multiple targets.
Table machine guns and autocannons hitting multiple units
| Range band | Distance | Number of units that may be shot at by machine guns per attack | Number of units that may be shot at by autocannons per attack |
| Far | More than 100cm /40in | 1 | 1 |
| Medium | Less than 100cm / 40in | 1D3 | 1D3 |
| Close | Less than 50cm / 20in | 1D6 | 1D3 |
Additionally machine guns and autocannons have the ability to possibly harm multiple targets per activation. These targets have to be in a radius of 5cm / 2in from the original target. So, the attacker assigns a target. If there are multiple units in said radius around the original target roll 1D6 to see how many units are possibly hit. Each target may only be hit once per activation.
Table machine guns hitting multiple targets
| Roll (1D6) | Number of targets possibly hit |
| 1 | 1 |
| 2 | 2 |
| 3 | 3 |
| 4 | 4 |
| 5 | 5 |
| 6 | 6 |
Table autocannons hitting multiple units
| Roll (1D6) | Number of targets possibly hit |
| 1,2 | 1 |
| 3,4 | 2 |
| 5,6 | 3 |
After the amount of possibly hit units has been determined, the attacker has to perform an attack roll with 2D6 to see if he has hit said units. Hit units have to roll 2D6 for effect and another 2D6 to pass a morale check.
Note: Also respect the blast radius of HE shells fired by autocannons. Each hit has a blast radius of 5cm / 2in. All units in this radius also have to check if hit. To do so the attacker has to perform an attack roll for each unit in the blast radius, no matter if friend or enemy.
Machine guns overheating
When opting for the double burst on MGs, that means shooting twice in one turn, the player must roll a 2D6 to check if the gun is overheating. An overheated gun has to cool down for one turn. A cool-down token is placed beside or under the miniature or miniature token.
SMGs, 20mm cannons or ARs do not have to check for overheating.
Table overheat check machine guns
| Roll (2D6) | Effect | Consequence |
| 2,3,4,5,6 | Machine gun overheats |
|
| 7,8,9,10,11,12 | Machine does not overheat |
|
Note: machine guns and autocannons that are not mounted on vehicles do need a crew. For light machine guns you need a gunner and a loader. Heavier stationary machine guns and autocannons need a crew of at least three men. When a machine gun or autocannon looses 50 percent of its crew it also looses the ability to shoot twice per turn.
Machine guns suppressing enemy units
Any machine gun may try to suppress enemy infantry, vehicles, planes and support weapons. While it will be relatively easy to suppress infantry, it will be harder to suppress a support weapon and a lot harder to suppress a tank.
Roll 4D6 (just like an attack roll) to see if the attempt to suppress the enemy unit was successful. Suppressed units will be pinned for one turn and not be able to perform an action.
Units with multiple crew members are suppressed for one turn when the number of suppressed tokens matches the number of crew members. One shot is good for one suppressed token.
Use the following table to see if the attempt to suppress was successful.
Table machine guns suppressing enemy units
| Unit type | Needed roll to suppress (4D6) |
| Infantry | 18 or lower |
| Softskin vehicles and support weapons without shield | 14 or lower |
| AFVs with armor below 2 and support weapons with shield | 12 or lower |
| AFVs with armor 2 and more | 10 or lower |
| Planes | 7 or lower |
Note: Bonuses for range bands and veterancy are added to the number players need to roll. Penalties for cover, injuries, conscript status are subtracted from the number.
Overwatch
All units and weapons except for artillery pieces may opt for overwatch at the beginning of a turn in order to support friendly troops. Overwatch is possible within the arc of fire of the weapon or unit. Units will perform this duty until the player orders otherwise at the beginning of a turn of his liking. The unit is marked with an „overwatch“ token.
Suppose an enemy unit decides to shoot at one of your units. In that case, the covering unit will shoot at the enemy unit first and try to break up the enemy attack or even kill the enemy shooter before he can harm a friendly unit. To excercise overwatch perform the attack roll first (4D6), when successful check for effect on (2D6) and morale (2D6) of the enemy unit. Everytime overwatch is successful, the enemy attack is broken up.
Anti air guns may also shoot at enemy planes in their arc of fire that attack friendly units.
The unit on overwatch only use its maximum number of attacks per round. Machine guns shooting twice will have to check for overheating. Overwatch takes place during the enemy turn. To keep track hit every unit that has actively performed its overwatch duty and spent his maximum number of shots for the turn with a spent marker.
Going into overwatch itself does not spend an action. But an action is spent per shot at attacking enemy units. These actions will be subtracted from the action counter in the next turn of the player that is excercising overwatch.
Covering fire
All units and weapons except for artillery pieces and anti tank weapons may opt at the beginning of a turn to give covering fire in order to support friendly troops. Covering fire is possible within the arc of fire of the weapon or unit. Units will perform this duty until the player orders otherwise at the beginning of a turn of his liking. The unit is marked with a „cover fire“ token.
Unlike overwatch covering fire will not be able to hurt enemy units but make it harder for them to hit their target. Attacking units will receive a penalty of -2 on all attack rolls per unit that is giving covering fire. As long as they are in covering fire mode units will automatically spend one action for the maximum number of shots they can fire at the beginning of each turn. Units giving covering fire may not perform any other action for the turn.
Covering fire takes place during the enemy turn. To keep track hit every unit that has actively performed its covering fire duty and spent his maximum number of shots for the turn with a spent marker.
Strafing, bombing and intercepting enemy units with planes
Tactical bombers and fighter planes may choose to strafe mulitple enemy units with the firepower of their MGs and/or autocannons in order to harm or suppress enemy units. Suppose a player chooses to go for a strafing run. First of all the player chooses a corridor that matches the wingspan of the plane and covers the full length of the table. After that the attacker has to roll 2D6 to see how many units located in the corridor his plane can possibly harm or suppress in this strafing run. Perform an attack roll (4D6) for every targeted unit. Every hit unit has to check for effect and morale. The strafing run may be broken up by enemy machine guns, anti air or enemy interceptors.
In order to intercept enemy planes the opposing player may assign one of his fighter planes at the beginning of the turn to this duty. If the interceptor manages to hit the attacking plane, the attack is broken up and the attacker has to check for the effect on the plane.
Tactical bombers may perform a certain number of HE / AP attacks per game by dropping bombs. The number of attacks depends on how well these units are armed. A JU 87B for example may perform two AP/HE attacks per egame. Tactical bombers may only attack one target per turn when going on a bombing run.
The attack may be broken up by interceptors or enemy AA.
Anti air guns attacking planes
AA guns will use their HE or AP value to shoot at enemy planes. Autocannons may try to get off multiple shots on the plane.Roll 4D6 to see if the attack is succesful. Use the following table to determine the effect.
Table effects of hits on planes
| Roll (2D6) | Effect | Consequence |
| 2,3 | Plane explodes |
|
| 4,5,6 | Heavy damage |
|
| 7,8,9 | Minor damage - bodywork pierced |
|
| 10,11,12 | Pilot injured |
|
Everytime a plane is hit an effect roll (2D6) follows. After that a morale check (2D6) is mandatory.
When in overwatch and the attacking plane within their arc of fire, anti air guns may try to break up the attack sequence of the plane or to maybe even shoot it down.
Dogfights: Planes intercepting enemy planes
To engage in a dogfight the attacking player obviously needs a plane, be it a fighter or tactical bomber. The first way to engage is to put the fighter or tactical bomber on duty to intercept enemy planes. The interceptor will be marked with an intercept token at the beginning of the turn by the player that assigned plane and pilot to this duty. Interceptors may only intercept one enemy plane per turn. Every shot they fire at the enemy plane is worth one action. Interceptors act during the enemy turn. The number of actions they use will be spent at the beginning of the next turn by the player that assigned plane and pilot to this duty. Every successful interception will break up the enemy attack sequence.
Planes will use the HE or AP value of their weapons to shoot at enemy planes. These values are detailed on the unit cards. Autocannons and machine guns may try to get off multiple shots on the enemy plane. Dogfights in Burst of Fire are always fought in close range.
Roll 4D6 to see if the attack is succesful. Always add or subtract bonuses or penalties for unit (in this case pilot and crew) quality to or from th needed attack roll. Everytime a plane is hit an effect roll (2D6) follows. Use the following table to determine the effect.
Table machine guns and autocannons hitting multiple units
| Range band | Distance | Number of units that may be shot at by machine guns per attack | Number of units that may be shot at by autocannons per attack |
| Far | More than 100cm /40in | 1 | 1 |
| Medium | Less than 100cm / 40in | 1D3 | 1D3 |
| Close | Less than 50cm / 20in | 1D6 | 1D3 |
Effects of hits on planes
Table effects of hits on planes
| Roll (2D6) | Effect | Consequence |
| 2,3 | Plane explodes |
|
| 4,5,6 | Heavy damage |
|
| 7,8,9 | Minor damage - bodywork pierced |
|
| 10,11,12 | Pilot injured |
|
After the effect of the hit was determined a morale check (2D6) is mandatory. Everytime a morale check fails roll 2D6 for the effect of the failed morale check. Always roll for the pilot first and then for the crew. Use the following table to determine the effect of the failed morale check on the pilot and crew.
Melee
To engage in melee presents a higher chance of killing enemy infantry or at least of making enemy units surrender. Infantry units may engage in melee if the target(s) is (are) within a range of 10 cm / 4 in.
Each infantry level and ranking officers have their own melee value.
Table melee values for infantry, crews, squad leaders and officers
| Type | Roll needed in melee (4D6) | Melee bonus |
| Conscript | 15 and below | Weapon bonus |
| Regular | 16 and below | Weapon bonus |
| Elite | 17 and below | Weapon bonus |
| Squad leader | Depends on quality level | +1 (plus weapon bonus) |
| Ranking officer | 18 and below | Weapon bonus |
The melee value is boosted by some main and side weapons. You can identify these weapons by their melee bonuses shown in the doctrine lists or on the weapon counters (see weapon counter on the left). Also, when defending a building, any infantry unit or ranking officer will also get a +1 on their melee value.
To engage in melee the attacker and the attacked player roll 4D6 simultaneously. If the number matches the melee value (+ bonuses / – penalties) the enemy is hit.
Effects of hits in melee
| Roll (2D6) | Effect | Consequence |
| 2,3,4,5,6 | Kill |
|
| 7,8,9,10,11 | Injury |
|
Vehicles running over support weapons and infantry
All vehicles bigger than motorcycles may try to run over multiple infantry units in their path without having to stop. Targeted Infantry units may roll 2D6 in an attempt to evade. If the roll is 8 or lower, the unit jumps out of harm’s way. Check for morale by rolling 2D6. Every roll 9 or higher kills the infantry unit. The cost of the infantry unit is put on the enemy combat score.
Also, all vehicles bigger than cars may try to ram enemy support weapons. An attack roll of 8 or higher on 2D6 destroys the support weapon and adds their point value to the enemy combat score. Every crew member may try to evade. Crew members are handled like infantry in the game mechanics.
After ramming a support weapon, succesfully or not, softskin vehicles are broken for the rest of the game. Their cost is added to the enemy combat score. Armored vehicles have to stop after ramming the support weapon and may be activated next turn.
Table vechicles running over enemy infantry and crew members
| Roll (2D6) | Effect | Consequence |
| 8 and lower | Infantry / crew evades |
|
| 9 and higher | Infantry / crew killed |
|
Table Vehicles ramming support weapons
| Roll (2D6) | Effect | Consequence |
| 7 or lower | Support weapon still operable |
|
| 8 or higher | Support weapon destroyed |
|
How to determine force morale
Besides levels and firepower, morale is a strong factor to be victorious. Teams set their force morale by rolling one D6 before the start of the first turn. The result counts for every player of the same team.
Table calculating force morale
| Roll (1D6) | Force morale |
| 1,2 | 8 |
| 3,4,5 | 9 |
| 6 | 10 |
Force morale will be the base for every morale check you have to perform during combat. But keep in mind that there are situations that boost or drain base morale value on the battlefield.
Morale checks
Flying bullets, explosions, and shrapnel put the psyche under duress. After every firefight, the receiving end of the shot – if alive – has to perform a morale check. The result will put the soldier or crew in a state that will influence the ability to fight. Morale checks are resolved by rolling a 2D6.
Being in cover, out in the open, or injured situations will affect the morale check with either a bonus or a penalty. All bonuses and penalties are added or subtracted from the roll needed. Bonuses and penalties may be accumulated. Bonuses and penalties are detailed in the following table.
Every time a soldier or crew member fails a morale check, roll 2D6 to determine the failed morale check’s effect.
Table calculating morale checks bonuses and penalties morale checks
| Situation | Bonus (+) added to or penalty (-) subtracted from the needed roll |
| Elite soldier or crew | +1 |
| Squad leader | +1 |
| Soldier / crew in soft cover | +1 |
| Officer nearby / officer in vehicle | +2 |
| Soldier / crew in medium cover | +2 |
| Soldier / crew in hard cover | +3 |
| Conscript level soldier or crew | -1 |
| Soldier / crew had to melee | -1 |
| Soldier / crew injured | -2 |
| Soldier / crew attacked from behind | -2 |
| Soldier / crew shocked | -2 |
Infantry absolve a morale check per soldier. Crews absolve one test per crew member. For soldiers the effects of failed morale checks are handled individually. For crews they are played cumulatetively. So for example, a crew of four has to gather four shock tokens to get the effects of shock in play.
Table infantry: effects of failed morale checks
| Roll (2D6) | Effect | Consequence |
| 2,5,8,11 | Shocked |
|
| 3,6,9,12 | Tactical retreat |
|
| 4,7,10 | Surrender |
|
Table vehicle crews: effects of failed morale checks
| Roll (2D6) | Effect | Consequence |
| 2,5,8,11 | Shock |
|
| 3,6,9,12 | Back up |
|
| 4,7,10 | Crew bails |
|
Table support weapon crews: effects of failed morale checks
| Roll (2D6) | Effect | Consequence |
| 2,5,8,11 | Shock |
|
| 3,6,9,12 | Reposition |
|
| 4,7,10 | Crew bails |
|
Table effects for failed morale checks for pilots and crew
| Roll (2D6) | Effect | Consequence |
| 2,5,8,11 | Shock |
|
| 3,6,9,12 | Defensive spiral |
|
| 4,7,10 | Pilot & crew members bails |
|
Note: Some tactical bombers have a pilot and crew. If the pilot dies or bails because of a failed morale check the whole crew and plane will crash. Add the points pilot, crew and plane cost to the combat score.
Random Event & Effect Cards
Some things on the battlefield are just not predictable. To simulate this and strengthen the game’s replay value, 25 random events and effects, including weather conditions, are available as this rulebook is being released.
Every player draws the number of Random Event & Effect Cards assigned to his doctrine right after he has completed his troops setup and before the first turn of the game starts. Some of the effects have a bonus on an individual player, while others are equally bad or good for all players. The effects and the duration of the effects are detailed on the cards.
Doctrines & Detachments
In Burst of Fire, all players choose a doctrine – the main focus on which arms and types of units to use. Doctrines will determine how well equipped the infantry, and support units can be, how mobile the force will be, how strong your numbers will be, and how much of a punch the force will deliver. Each doctrine has its own doctrine list. Doctrine lists can be found on our website www.tankette-publishing.com.
These lists detail units available to each doctrine and how expensive they are. The (additional) points a unit is worth is calculated by total firepower, armor, speed and capacity (only transports). (See Combat Score)
Each doctrine can field different detachments. Every detachment fields its own ranking officer and comes with a number of Random Event & Effect Cards they can draw before the game starts. Elite doctrines like paratroopers or cavalry may draw more than one Random Event & Effect Card.
At the same time the type of detachment sets the type of units and quality of units you may select. Also, each detachment comes with special rules for the setup on the battlefield.
The size of detachments may be set by the players. We recommend a size of 150 points.This will give players the opportunity to have one or two squads of infantry with some additional fire support by vehicles or support weapons on the field.
Appendix: Fieldworks and additional cover
In Burst of Fire, players will be able to buy and set up fieldworks like sandbags, barbed wire, minefields or bunkers before the game. Some fieldworks can also be attributed to a player by drawing a matching Random Event & Effect Card. Fieldworks may not be moved but can be destroyed with high explosive ammo. Fieldworks are mostly used by infantry and support weapon heavy detachments.
When buying fieldworks or drawing a matching Random Event & Effect Card, players may place these fieldworks in a sector of their liking. A sector is 20 x 20 cm, 9 x 9 in long and wide.
Sandbags
Sandbags offer soft cover for infantry, support weapons, and tanks. Attackers suffer a penalty of -1 on every attack roll. HE ammo can destroy these fieldworks. Also, AFVs can overrun the structure and destroy it. When destroyed, sandbags do not offer any kind of cover anymore.
Bunkers
Bunkers are the only “super hard” cover, making every enemy unit attack at -3. Six soldiers or one support weapon plus crew will fit in a bunker. Bunkers can be destroyed by bombs. Also, flamethrowers and grenades will be very effective against soldiers inside.
Tank traps
Tank traps block the advance of any AFV, wheeled support weapon, and soft skin vehicle. Tank traps may not be taken apart by infantry. These fieldworks only can be destroyed by bombs or hit by HE shells bigger than 37 mm caliber.
Minefields
Mines are not visible on the map but can affect every unit, be it friend or foe. Minefields may not be swept during a game. The sector stays mined no matter what. However, the opponent may mark the mined sector with mine tokens once the first unit has been affected.
Barbed wire
Barbed wire stops infantry, support weapons, wheeled vehicles, and horses from advancing. It may be destroyed by HE shells of at least 37 mm caliber or overrun by tanks.
Craters
Craters are not fieldworks, but they offer additional soft cover. Craters are placed after HE shells and bombs were dropped. Blast radius will decide how big the crater is.
Ruins / rubble
May be used not only for cosmetic and atmospheric purposes, ruins of stone buildings offer hard cover, destroyed wooden buildings offer soft cover. The ruin token is placed on the building / structure that has been destroyed.
Appendix tokens
WP TABLE TOKENS
Playing Burst of Fire solo
Here is a look on how to set up solitaire play. In solitaire play, you will face yourself as an opponent. But you will not exactly know what the enemy forces will look like or where they will set up and push next.
To play these solitaire rules, you only need up to four additional bags or boxes to draw infantry, vehicles, support weapons, main and side weapons.
Play random sides & scenarios
- Roll D6 for Axis / Allies, nations, etc.
(p.e.: 1-3 = Axis; 4-6: Allies)
- Roll D6 for Doctrines
Germany for example (1,2 = Infantry; 3,4 = Mobile Reconnaissance; 5,6 = Armor)
Poland for example (1,2,3 = Cavalry; 4,5,6 = Infantry)
- Roll D6 for Map Design
(1,2 = City, 3,4 = Rural, 5,6 = Mix of both)
- Roll 8D6 and add numbers for random mission objective/scenario from the rulebook.
WP DATA TABLE
8-12 = Probing the enemy lines
Victory zones
13-17 = King of the hill
18-22 = Keep the supplies coming / clear the road
23-27 = Delay the enemy advance
28-32 = Breakthrough / Hold the line
33-37 = Escape the pocket
38-42 = Pocket battle
43-47 = Prisoner of war
48 = Reroll
- Roll D6 for attacker / defender (depending on scenario)
Higher number gets to attack
Setting up your forces in solo play
- Set up your core force.
- Roll for your additional points.
- Select your additional weapons and forces.
- Roll 4D6 for your deployment zone/board edge to start from. The enemy
always starts opposite to your position (north-south, for example).
4,5,6,7,8 = North
9,10,11,12,13 = East
14,15,16,17,18 = South
19,20,21,22,23 = West
24 = Reroll
- Put your forces on the board.
Setting up the enemy forces
- Set up core units of the enemy Doctrine.
- Roll for additional points and buy units as you see fit.
or
- Put infantry and any other weapons than carbines in separate boxes or bags. Fill another bag or
box with vehicles and support weapons that fit the doctrine. Put regular and elite vehicle crews in
an additional bag or box.
- Infantry/ Cavalry doctrines: Roll 3D6 for additional points to be spent on soldiers.
- Armor doctrines: Roll 2D6 for additional points to be spent on soldiers.
Equip each soldier with a carbine by default without any extra cost
Draw infantry/cavalry counters until points used.
- Roll 2D6 for upgrades on handheld weapons and side weapons
Draw weapons from the bag until points used.
Highest infantry levels will always get the best weapons.
- Infantry/ Cavalry doctrines: Roll 3D6 for additional points to be spent on support weapons
- Armor doctrines: Roll 3D6 for additional points to be spent on vehicles
Choose or draw fitting vehicles and support weapons until all points are used up.
Vehicles and support weapons have inexperienced crews by default. They do not have to be
bought separately.
- Roll 1D6 for the number of possible support weapon upgrades
Place regular & elite crew counters in the bag.
Draw crew from the bag until all points used up.
- Always upgrade crews of most valuable vehicles and weapons.
- Always have a close look at matching doctrine lists.
Placing the enemy forces on the board
- Roll a D6 for each unit to determine the deployment zone sector where the unit will be placed.
(1,2 = left flank; 3,4 = middle; 5,6 = right flank)
Place enemy units, the most valuable unit of each category is always placed first.
- AFVs
- Transports
Roll a 2D6 to see how many infantry units it will transport without exceeding maximum capacity.
Lowest infantry levels will take the ride.
- Support weapons and crew: the most valuable unit is placed first.
Non towed AA and AT always deploy in ambush mode.
At least one AA/AT will start the game being towed.
- Place infantry: level decides which unit is placed first.
- Place ranking officer in the deployment sector with the most units he can command.
Random event & effect cards in campaigns
After the troops are set up: Draw Random Event & Effect Cards for each side before turn one. The enemy
will use his cards right from turn 1.
Morale in campaigns
Both sides roll 1D6 for force morale.
Initiative and actions
- At the beginning of every turn roll a D6 for each side. The higher number gets the initiative and
starts the turn.
- Sides activate units alternately after that.
If one side has used all actions, the other player will use all of his remaining actions in a
row.
Which enemy unit takes action first/next?
Every turn, you have to determine which units will be activated by the enemy.
Roll D6 for sector units will activated in first.
(1,2 = left flank; 3,4 = middle; 5,6 = right flank).
Activation ladder for AI:
- Ranking officers
- Units closest to the mission objective
- AFVs
- Support weapons with the most firepower
- Elite
- Regulars
- Fastest units
- Everything else…conscripts
Track enemy actions left for the turn on the Action Counter, use units in the adjacent sector.
When previously activated units are located in the middle roll D6 for the sector units will be activated next.
(1-3: left flank, 4-6: right flank).
General enemy AI behavior
- The enemy will try to destroy as many units as possible and aim to reach the mission objective as fast as possible.
- The enemy always moves with a purpose towards (in order): mission objective the enemy (if not in super close range) better cover abandoned enemy gear.
- Ranking officers always target the best friendly units in range with their orders and aim at the most dangerous enemy units.
- When in range, enemy infantrymen always will automatically use one action to scavenge superior weapons or refill support crews to make support weapons fully operable again.
- AT guns always shoot at AFV with the lowest armor value in firing angle first.
- Artillery always aims for enemy support weapons and infantry with the lowest cover first.
- Apart from that, the enemy always chooses a target that will bring the most points on the Combat Socre or units that are threatening the mission objective.
- The first action of enemy mounted troops is to drive and unload in the best cover available.
Campaigns
Burst of Fire presents the opportunity to create your own campaigns. Campaigns may be played by 1-6 players.
General Campaign Ladder
WP TABLE
There are nine scenarios available at present. Their sequence forms the campaign ladder. The ladder tells a story of a sequence of situations soldiers and commanders might experience during a campaign.
For the clear victor it will be a story from scouting to encircling and crushing the enemy. But during times of war, there often is an unexpected twist in the plot. It is highly recommended to create a different map for each scenario. You can also use the solitaire rules in order to generate random settings for the maps.
Both sides start out evenly matched. The roles of attacker / defender will be assigned after map 2 of the campaign ladder: Whoever loses the “king of the hill” scenario will defend until he has won a battle.
While the attacker will try to advance by scoring victories. The defender will try to stop the attacker from advancing and reverse the course of the campaign and his role from defender to the attacker. The roles are neutralized as soon as the attacker hast lost a battle. Then the campaign ladder will reset to “probing the enemy lines”. This battle will be played on the previously played map.
As the attacker progresses, it will get more challenging for the defender to pull such a coup. Simply because of the momentum that will carry the attacker in the later stages of the campaign. Embodied by higher morale, stronger core units, and better access to resources.
If a player reaches the end of the ladder, the campaign is finished. The maximum number of games for campaigns is 10. As soon as 10 games are played and the end of the ladder is not met by any team or player, the total number of won games determines the victor of this campaign.
WP TABLE CAMPAIGN LADDER
How to score points and advance in a campaign
- Points are scored by killing units and accomplishing decisive or strategic victories.
- A decisive victory is scored by accomplishing or keeping the enemy from accomplishing the mission objective.
- A decisive victory is worth 15 points.
- A strategic victory is achieved by making the enemy retreat due to heavy losses (Combat Score).
- A strategic victory is worth 7 points.
- Each lost game is still rewarded with 3 points.
- At the end of each game, numbers on the Combat Score are added to the victory points.
- Points scored become additional points and will be used during the campaign to upgrade core units.
- Always keep track of the total score on a piece of paper.
How to determine force morale during the campaign
Morale will be determined at the beginning of the campaign by rolling a D6.
The morale of your men will be influenced by the course of the campaign.
- Three losses in a row will make force morale drop by one point.
- Five losses in a row will make force morale drop by two points.
How to upgrade core units
Both sides may upgrade their core units after each game is played. For this purpose, they may use the points they have gathered in the recently played scenarios by achieving strategic or decisive victories and/or killing enemy units.
- Infantry may be upgraded to higher ranks and equipped with more or better weapons.
- Vehicles may be upgraded to more powerful/useful vehicles. However, they have to stay within their “boundaries”.
- Transports can only be upgraded to transport units.
- Armored cars may be upgraded to tanks.
- Light tanks may be upgraded to medium and heavy tanks.
- Support weapons may be upgraded to more powerful support weapons.
Salvaged vehicles and weapons
The victor will claim all weapons and vehicles left behind by the enemy. This only applies to abandoned or scavenged vehicles, infantry- and support weapons.
In the next campaign game, these weapons and vehicles may be part of the foreign force and do not have to be bought with additional points. In contrast to scavenging and operating enemy weapons during a game, crews and infantry will operate enemy vehicles and weapons without any restrictions or penalties.
Credits
A big thank you goes out to all of the people who contributed to make this game happen. You will always have a special place in my heart!
- Copyright: Tankette Publishing
- Rights for distribution: Tankette Publishing.
- Rules: Christian Mannsbart
- Christian Mannsbart & Khandaker Ashique & Rahat Khan
- UI cards and illustrations: Khandaker Ashique
- Core rules and layout: Christian Mannsbart
- Playtest Crew: Martin Börner, Alexander Witte, Christian Mannsbart